Monday, July 30, 2012

Barcelona, a City Like No Other

Gaudi's touch permeates the city

Wandering in the Gothic quarter

Barcelona, a bustling Mediterranean metropolis
Food Wonderland

Spain can be very proud to have two cities like Madrid and Barcelona. If Madrid will delight your senses than Barcelona will overwhelm them. If you are about to visit Barcelona prepare yourself for a sensory overload in Gaudi's hometown.

Barcelona is arguably one of the most beautiful cities in the world. It's my second visit to this northern Spanish metropolis, but I felt just as delighted as on my first trip there.

The streets, the buildings, the smells, the sea, the people and the little surprises here and there will keep you happy during your entire stay here.

Mediterranean and cosmopolitan, yet clinging to its unique Catalan cultural heritage, a blend which only adds to the charm of the city. No wonder it is the fourth most visited European city with several millions of tourists coming each year to immerse themselves in the uniqueness that is Barcelona.

From an ancient Roman town to a modern bustling metropolis, Barcelona surely impresses. To many, the work of Antoni Gaudi defines the city with its one of kind approach to architecture and style. His work spread across the city in the form of buildings, parks and perhaps most prominently by the Sagrada Familia (Holy Family) cathedral which dominates the Barcelona landscape. This cathedral is a true gem, although some parts are still under construction, it is an absolute must see if you ever visit the city.


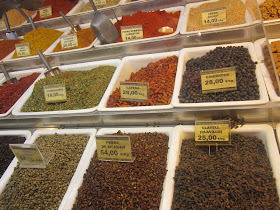
I am sure you would want to visit the old city and enjoy its unique architectural style, pay a visit to the museums and walk on the sea-side promenade, but one thing I absolutely loved about Barcelona is its famous food market: La Boqueria. Located in the heart of Las Ramblas, it's my favorite spot in the city. It makes sense for food lovers, it evokes your senses and calls your attention for the neat display of fresh products that enchant you with their bright colors.

I won't say much, I will leave you with these pics that need no comments. Just be sure to visit La Boqueria should you come to Barcelona.


Can´t wait to shop some of these treats and prepare some exquisite recipes!!

Friday, July 27, 2012

Feuilletine, Crunchy Golden Leaves

A perfect summer treat with feuilletine


Throughout culinary history many great ideas came to be either by accident or by the need to save on resources. These accidents have enriched world cuisines with recipes and ingredients that we now take for granted. 


Feuilletine is one of these delicious "accidents". Feuilletine is derived from feuille which is the french word for paper.  These feuilletine were meant to be paper thin crepes known as crepes dentelles or gavottes, but some would break and would be tossed away. As nothing should be thrown in the kitchen, these crepes morphed into baked crispy sweets that can be incorporated in many desserts for added sweetness and crunch. 

I needed these golden sweet sheets for an entremet I wanted to make, however, feuilletines are hard to find. Instead of ordering them online, which is always a possibility, I decided to make them at home. Home cooking and baking always cheers me up, so it wasn't a hassle to take the decision to make the feuilletines at home but rather a challenge I was willing to take. Now finding a good recipe was the actual challenge, but where there's a will there's a way. 


So here's the recipe and what you need to do. 


First, you will need: 
  • 127 g butter
  • 113 g brown sugar
  • 1 tablespoon baking soda
  • 170 g molasses
  • You can add many flavoring agents, it's really up to taste, I added orange zest, vanilla, and cinnamon
  • 1 egg
  • 368 g siflted flour
  • 59 ml of milk.

The mixture before adding the egg

The method:

Start by creaming the butter, sugar, baking soda, orange zest, vanilla and cinnamon. When the mix is fluffy and light stop mixing and add the molasses. Incorporate the molasses by mixing for a minute or so, then add the egg and mix until fully incorporated. 
Scrap down the batter that is sticking on the sides then beat again on low speed. Add all the flour, then the milk. Mix untill well combined
The texture of the mixture when all ingredients are combined

At this stage, you will need to spread the mixture in several batches (6 or 7) on silicon mats. You can't manage with a parchment paper alone. This is the tricky part of this recipe. You need to spread the mix as thinly as possible, which is not always easy. I had some difficulty with my old silicon mat, it didn't allow me to reach the thinness I desired, but the result was perfectly acceptable.Aim to have a translucent layer which you will bake in a preheated oven (180C) for no more than 8 minutes. 

The tricky part of spreading the batter as thin as possible

Wait for the feuilletine to cool before you crumble them. You can control the size of the bits and you can even use a paper stencil to make any shape you want.

Now the feuilletine is ready to be used. They add excellent taste and texture to ice creams, layered yogurts, or used with truffles for a crunchier filling or topping. The list is endless, just use your imagination!
Waiting for your imagination
Here's how I used the feuilletine. I made a layered yogurt and fruits, a pretty refreshing dessert. I had some homemade greek yogurt ice cream, so I put a scoop of  ice cream then chunks of mango and strawberries followed by feuilletine and repeated this process until the cup was full. I topped the cup with some whipped cream and maple syrup. A perfect summer treat. 

Sunday, July 22, 2012

Tarte Tatin


Throughout history, humans gave a symbolic status to many natural elements and food items surrounding them. So what was the symbol of eternal youth in pagan Germany, the symbol of beauty in Mesopotamia, and a source of immorality in the garden of Hesperides? More importantly, what's the fruit that lured humanity into sin according to popular misinterpretation of the Bible? Yup, you guessed it, it's the humble Apple.


Apples are widely popular and incredibly versatile ingredients that go well in many savory and sweet recipes. Apples are the star ingredient of one of the most famous and delicious French recipes of all times: Tarte Tatin.

The Tatin sisters who worked at the Hotel Tatin in the village of Lamotte-Beuvron in France's Loire Valley, entered history through a random series of events. Stephanie Tatin was the hotel's cook, while her sister Caroline was the hostess. They successfully managed the hotel  located in the Loire Valley, a region many call the garden of France due to its abundance of fruits, vegetables and vineyards.


So how the Tarte Tatin came to be? In 1889, at the peak of the hunting season, the hotel was overwhelmed with hungry guests. While Caroline was taking care of the guests, Stephanie was running frantically in the kitchen from one stove to another preparing food. As she was preparing the traditional and well known apple pie, she forgot the pan of apples on the stove. The smell of caramelizing apples caught her attention. Fearing the apples might burn and in an attempt to save them, she put the pie crust on top of the apples and put the pan in the oven to cook it. Stephanie admired the result and so did the guests. And there you have it, out of a mere coincidence a sublime dessert was born. 

The original recipe has only few ingredients, apples (reines de reinettes or king of the pippins variety), sugar, butter and pie crust. However, throughout the years some variations were made such as adding spices or using puff pastry.

Organic reines de reinettes apples rich with their natural flavor are not easy to get hold of, so I always add spices to my apples to enhance the flavor. Many spices can be added, but cinnamon and apples are a marriage made in heaven.


You can use either a traditional pie crust or puff pastry for this recipe. I honestly prefer using puff pastry, it's lighter, richer and just adds a magical touch to this dessert. 

In order to make this delicous tarte tatin you will need:

  • 6 granny smith apples
  • 100 g brown sugar (demerara preferably)
  • 35 g butter
  • 30 g maple syrup
  • pinch of salt
  • 1/2 teaspoon of cinnamon
  • pinch of freshly grated nutmeg
  • pinch of fresh ground star anis and cloves
You can substitute the spices with vanilla and if you are a purist you can omit the addition of spices and vanilla altogether.

Follow these steps and you will surely make an excellent dessert.
Peel and core the apples, put them in a bowl full of water and the juice a a lemon. The lemon will stop the browning of the apples.

On a low heat and in an oven proof pan combine sugar, butter, maple syrup, salt and the spices. Let the sugar melt slowly and do not stir it, just move the pan gently to avoid that the sugar burns.
When the caramel is ready, line the apples in the pan keeping in mind that they will shrink after cooking. You can either line them in a pretty fashion or keep free form, whatever you prefer.


Let the apples cook for a while, turn them, and when you see that the caramel is bubbling, you can turn off the heat and let them cool for few minutes.

While the apples are cooling, prepare your puff pastry. Cut a sheet a few centimetres bigger than the pan you're using. Cover the apples with the dough, make few holes in the pastry so you won´t have steam condensation and cook in a preheated oven (200C) until golden brown which usually takes 20 to 30 minutes.

You can make your own puff pastry ( I will share the recipe in an upcoming post) or you can use a store bought one. Please make sure to use a brand that you trust and that actually uses butter to make the pastry, otherwise the taste won't be there. 
Leave it to cool for 5 minutes, place the serving dish over the pan, cover it with aluminium foil, then with some towels and turn it over, be careful not to spill any of the hot caramel!

The smell at this point overwhelms the senses. You know in advance that the caramelized apples along with the puff pastry soaked in this luscious caramel will be just heavenly.  

Serve warm with a sccop of ice cream, and listen to Piaff singing La vie en rose!! Indulge!

Sunday, July 15, 2012

Almond Snowdrops: Many Names, Same Great Taste

Almond snowdrops piled elegantly on a serving plate

A delicate cookie popular in many parts of the world, believed to have originated in Al Andalus, or Moorish Spain. The Moors were fond of butter, honey and nuts creating buttery cookies based on these rich ingredients.
The Moors left Spain, but the tradition of these cookies survived in Sevilla, and from this city, the recipe traveled to many parts of Europe before landing in the New World.

These cookies are known by different names such as butterballs, melting moments, sand tarts, Russian tea cakes, whereas in Spain they are known as polvorones. But they are also widely known as Mexican wedding cakes. During Hispanic weddings, these rich and sweet cookies are usually served to guests. The Mexican label is probably due to the colorful paper wrapping in which the cookies are put in.

A while back, while surfing the web, on the hunt for new ideas and recipes, I came across one of the recipes of these cookies with the evocative name of Almond Snowdrops. The name itself made me want to try it, let alone the pictures of these beautiful cookies.  The first time I tried them, they turned out to be great. 

For my second attempt on making the recipe, I decided I wanted to try two versions, the plain ones and chocolate ones.


For the basic almond snowdrops you will need:
  • 115 g of butter at room room temperature
  • 1/4 cup confectioners sugar (add extra for coating the cookies)
  • 1/4 tsp salt
  • 35 grams of freshly toasted almonds, coarsely chopped (other recipes require ground almond, but I prefer some the texture that coarse chopping provides)
  • 1 cup of flour
  • 1 tsp vanilla extract                                                                                                                                
Now follow these simple steps to make these delicious cookies: 

With an electric mixer, beat the butter untill soft and creamy. Slowly add the sugar and salt and beat until the mix is fluffy. Incorporate  the vanilla.

While mixing the dough I thought of boosting its flavor by adding a quarter teaspon of orange zest. You got to love just how fragrant and refreshing orange zest is.

Gradually start adding the flour and mix until well combined. Finally combine the roasted almonds.
Coarsely chopped roasted almonds add flavor and texture

Start shaping the dough into small balls. If the dough feels too soft leave it in the fridge for some time to firm up before you resume shaping.

Once the shaping is done, put them on a tray covered with parchement paper, leaving  at least a 2 cm space between them . Put in the fridge for about 20 minutes, or until firm.

The plain and chocolate snowdrops balls shaped and ready to be baked
Bake in a preheated oven (180C) for 15 to 20 minutes, the cookies must remain white but firm to the touch.
Dust with confectioners sugar once baked, then let them cool for 5 minutes.

Baked cookies waiting to be fully dusted with sugar

Fill a plastic bag with sugar, place few cookies in the bag and shake until coated. Once coated they will have the characteristic snowdrop-like shape which makes them such a feast to the eyes. 
An inviting pile of plain and chocolate almond snowdrops


For the chocolate almond snowdrops variety you need:
  • 85 g of butter at room temperature
  • 2 tbp of confectioners sugar
  • 60 g flour (you might need a bit more)
  • 25 g high quality cocoa powder
  • 30 g of roasted and coarsly chopped almonds.
  • 1/4 spoon of cinnamon (optional, but recommended)

Combine the cocoa powder with the flour and then follow the same steps as with the plain almond snowdrops.
If you see that the dough is difficult to manage, sticky and cannot be rolled, gradually add a bit of flour until the desired consistency is reached.

This dessert goes really well with champagne

Enjoy with coffee, tea or even champagne!!
Cheers!!

Make several batches as they will fly quickly and those that remain will taste better with time!


Monday, July 9, 2012

Sacher torte: un trocito de historia!


Es fascinante como que algunas famosas tartas y postres tienen sus únicas historias de creación lo que añade personalidad y hace que sean mucho mas especiales y con una calidad dimensión humana. 

La historia de esta tarta comenzó en 1832, cuando Wensel Clemens Prince Metternich, ordenó la creación de un manjar digno para sus invitados de alto rango.

El destino intervino aquel día, ya que su chef estaba enfermo así que la creación de esta tarta fue encargada a un aprendiz de 16 años en su segundo año de estudios, al perspicaz y talentoso adolescente Franz Sacher.

La receta que creó fue un éxito total: una tarta suave y esponjosa con deliciosa mermelada de albaricoque debajo de una estupendo cobertura de chocolate.

Cuando Sacher llegó a ser un cualificado chef profesional y a trabajar por su cuenta ofreció su creación al gran público, La tarta tuvo una inmensa acogida y un éxito irrebatible y luego fue nombrada Sacher Torte, en honor a su creador.  

Se dice que la receta original del Sacher es un secreto bien guardado por el Hotel Sacher, sin embargo muchos intentaron recrear la receta, algunos tuvieron éxito y algunos no tanto. En internet abundan cientos y cientos de recetas, aquí pondré la receta que yo hice ya que el resultado fue muy bueno.

Hace casi 10 años, estaba en Viena, la cuna de esta tarta, y quise probar ese famoso manjar, así que visité una de la más famosas cafeterías de la ciudad que por desgracia ya no me acuerdo del nombre, eso sí recuerdo todas las sensaciones de aquel momento. Una delicia disfrutada en una ciudad encantadora y Bourgeoise!

Probé varias recetas del Sacher y voy a compartir la que me llevó otra vez a sentir aquella experiencia Vienesa, y me atreví a añadir pequeños detalles personales lo que hizo que la tarta sea todavía más diabólicamente deliciosa.

El resultado de un trabajo duro: Un postre de lujo!

Y lo que necesitamos:
  • 175 gr chocolate negro
  • 150 gr mantequilla blanda
  • 100 gr azúcar glas
  • 6 huevos, separados
  • 60 gr azúcar
  • 150 gr harina (tamizarla varias veces, es una tarta esponjosa y así tendremos una tarta mas delicada)
  • 1 cucharadita de vainilla
  • Pizca de sal
  • Mermelada de alabricoque

Nota: Yo usé 4 huevos en vez de 6, solo hay que calcular la cantidad requerida para cada ingrediente por cada huevo
La tarta recibiendo su baño de chocolate!

Y para la cubertura se necesita:
  • 200 gr de chocolate negro
  • 200 gr de azúcar
  • 100 ml de agua
  • 1 cuchara de jarabe de maíz

Y manos a la obra:
Con un baño maria derrite el chocolate, añade la mantequilla y mezcla bien hasta que se quede cremoso.
Agrega  el azúcar glas y mezcla muy bien. Incorpora la yema del huevo, una a una, y bate bien hasta que la mezcla se quede homogénea.

Ya puedes añadir la vainilla, y algo opcional, una cuchara de whisky, yo lo hice porque quita cualquier sabor indeseado de los huevos y da un toque especial.
(En otras recetas se bate la mantequilla hasta que se quede blanda y cremosa luego se le añade el azúcar glas, siguiendo luego los mismos pasos. He probado los 2 métodos y el resultado no varía)

Poco a poco, añade la harina y mezcla bien hasta que esté bien incorporado.
En un bol grande, bate las claras con el sal, hasta punto de nievo, agrega el azúcar y batir hasta que se quede firme, también puedes añadir un poco de vainilla o algo de alcohol por quitar el olor de los huevos.

Empieza a añadir las claras a la mezcla del chocolate, añade un poco y mezcla para que el chocolate se queda mas liquido, luego añade las claras en 3 o 4 lotes,  con una espátula y removiendo, de abajo a arriba, lo justo para que se incorpore.

Divide la mezcla en 2 moldes de 18 cm, cubiertos con papel para hornerar, mantequilla y cacao en polvo, y hornea en un horno precalentado a 180 C durante 18 a 20 minutes.

Deja enfriar antes de quitar el papel. Prepara la mermelada (unos 200 gr), calentándola a fuego lento, se puede añadir ron moreno o lo que añadi yo fue ron blanco y un poco de whisky.

Unta una de las tartas con la mermelada y luego añade la otro ( yo añadí con la mermelada ganache de chocolate, inexistente en la receta original , hecho con 130 gr de chocolate y 70 ml de nata). Pasa la mermelada por un colador y unta toda la tarta. Deja reposar durante un poco de tiempo.


Una vista irresistible
Mientras prepara la cobertura. Combina el azúcar, el agua y el árabe de maíz, a fuego lento deja q el azúcar se derrite, luego deja hervir durante unos minutos.

Fuera del fuego añade el chocolate troceado y no mezcles hasta que se derrite.  

Después de mezclarlo bien y tener un chocolate liquido pero consistente, deja enfriar 2 a 3 minutes y a cubrir la tarta, puesta sobre la rejilla, con esta mezcla majestuosa de chocolate.


Pincha con un palillo cualquier burbuja que se pueda ver en la cobertura, y intenta no mover la tarta de la rejilla hasta que el chocolate haya secado bien.
He decorado mi tarta con perlas de azúcar doradas y con gotas de chocolate que hize con ayuda de un cornete de papel, y con lo mismo escribí Sacher!
Un color que va muy bien con un postre tan rico


Y a disfrutar de una porcioncita!
Y listo, buen provecho!!!