Monday, May 30, 2016

Vegan Strawberry Galette!


Despite all my sugary excesses I do try to make an effort to eat healthier. Recently I started adding super foods in my daily meals, like hemp seeds, cocoa nibs, and maca among others.

I´m not a vegan nor a vegetarian person, however I´m not a meat enthusiast either. Actually, I do remember, along with my siblings, asking mom to remove meat from many traditional dishes, and we were always happy with the result. Moreover, our Eastern Mediterranean diet features many scrumptious dishes that are entirely based on vegetables; that's why I have a natural penchant for vegetables, herbs and spices and could go through many days without eating a single piece of meat.


Though I won't become a vegan anytime soon, I am enjoying making vegan desserts knowing how hard it can be to give up on dairy products in baking. During the lent season, I challenged myself to have daily vegan meals and few desserts to keep me going. I was more than satisfied with the results. Vegan meals shouldn't compromise on taste but just be really healthy, comforting and delicious in equal measures.


One of my earlier vegan baking attempts was a vegan carrot cake in which I just needed to substitute the eggs with something else. However, with cakes that demand butter or for shortcrust pastry, things get a little bit trickier as butter substitutes rarely deliver in both texture and flavor. Luckily, a German shop selling premium quality coconut butter close to where I live. Now I no longer had an excuse not to make a vegan pie or galette!


Though I went with strawberries for the filling, you can use any fruit you like. It's strawberries season now and the fruits are at their prime so it was a natural choice for me.


Working with coconut butter is a new thing for me, therefore, I am confident that with time I will get better results. The dough was a bit tricky to handle, especially when cold, however, it tasted great and had the crumbly texture that I wanted.


I made two galettes, a big and a small one. I varied the fillings slightly between the two, but kept both really simple.


Now let's bake, vegan style!

For the crust you need:
  • 300 g flour (I used cake flour)
  • 165 g cold coconut butter 
  • 30 g sugar
  • ice cold kirsh, vodka or just water (about 4 to 5 tbsp)
  • dash of salt
Combine all ingredients but the liquid, and process for few seconds, when you get a sandy texture start adding the liquid, one tbsp at a time, once you see the dough coming together, stop your processor. Now, line a clean working surface with cling film (or aluminum foil if you prefer), remove the dough from the food processor onto the cling film. Work the dough slightly with your hands so it comes together and shape it into a disk. 
Cover it with the cling film and place it in the fridge for at least an hour. It is better if you prepare the dough one day ahead, which is what I usually do.


The amount of water that you will add depends on the quality of the flour and the water contained in the butter. Don't be tempted to put more water as the dough might seem dry at first, but when it rests in the fridge, it comes together nicely and the butter is absorbed  by the flour.

Remove the pie dough from the fridge 20 to 25 min before you start working with it. I divided the dough into 2 parts,  With the big portion I got a 23 cm disk (6 mm thick) and with the smaller one a 15 cm disk.

For the filling: big galette
  • Strawberries (the quantity depends on how you arrange them and to which thickness)
  • 1 to 2 tbsp sour cherry jam
  • lilac sugar (or vanilla sugar)
Spread the jam in the middle of the dough, leaving 3 cm from the edge and then arrange the strawberries. Fold the edges of the dough and sprinkle with sugar. You can brush the edges with vegan milk or cream.


        Small galette:
  • strawberries
  • 1 tbsp apple butter
  • 1 tbsp ground almond
  • cinnamon and sugar to sprinkle
Mix apple butter and almond and the spread in the middle of the dough, again leaving about 3 cm free. Arrange the strawberries, fold the edges, sprinkle with cinnamon and sugar.

Bake the galettes, in a preheated oven (180C) for about 20 to 25 min, or until edges are golden.

Once the galettes are cooled a bit, give them a shower of powdered sugar and serve with the ice cream of your choice, preferably vegan but a regular ice cream would do. 

Enjoy!


Saturday, May 21, 2016

Aich al Saraya: A Feast for the Serail, Available for You Too!


On May the 22nd Christians celebrate Saint Rita´s Day, a very beloved and venerated Saint among the Christians and specially the catholics of the middle east.

My mom named me after her, and so many others moms in that region!! During my school days I recall having at least 3 or 4 Ritas in class. The teacher had to call the attention for one and the class would be quiet in a snap!

Before moving to Spain, my family always celebrated this day. Nowadays, they do it in my absence, although they make sure to call me and wish me a "Happy Saint Rita's day".


My aunt whose name is Marguerite, though we call her Margot, celebrates the feast and her birthday on that day. During that day, she would always make her specialty, the dessert that I will share with you in a while. As she would chill the dessert, it was always a welcome since during May hot weather makes its appearance on the eastern shores of the Mediterranean quite clearly. My aunt is not only a great person with the sweetest heart ever but also is a great cook. Ever since I moved here I stopped enjoying this childhood dessert, so this year I decided to ask for her recipe and make some for me!

This dessert has been around for centuries. The name in Arabic is "Aish el Saraya" (عيش السرايا); roughly translated it means"the Serail's Bread". Though it was made with few key, nowadays widely available, ingredients, the dessert must have been back in time mostly out of the reach of the masses.


Like many desserts, it calls for the use of stale bread. The bread is then flavored with caramelized sugar, enriched with a layer of fresh clotted cream and finally adorned with the widest assortment of nuts possible. The result must have surely enchanted the governors and the elite that inhabited the serails of the Eastern Mediterranean back then. Luckily for us, the dessert is no longer exclusive and is widely available at shops but can be easily made at home.
Just note that there are so many ways to make this dessert, and this is just one of them!

For  20x25 cm pan or 26 cm round pan you need (I used 2 round pans: 15 and 12 cm and 1 small cup)

For the bread layer:
  • 120  toasted bread
  • 1 cup of sugar (about 225 g)
  • 1 cup of water
  • few drops of lemon juice
In a sauce pan, pour the sugar and on a low heat let it caramelize, it will take about 10 min. Once it´s golden brown, pour the water, be careful as it will splatter. then add the lemon juice and let the caramel dissolve completly in the water.  Leave it to cool.


Meanwhile you need to crumb the bread (you can use your food processor or just put the toasts in a plastic bag and bash it with a rolling pin) once you have tiny little crumbs pour over the cooled caramel, mix well until you get a soft and spreadable mixture. If it´s too liquid add more crumbs and if too thick a bit of water!
Cover the bottom of the pan with the bread mixture and set aside.

For the cream layer you need:
  • 4 cups of milk
  • 4 tbsp sugar (add a bit more if you desire a sweeter cream)
  • 75 g corn flower
  • 1 1/2  tbsp orange blossom water
  • 1 1/2 tbsp rose water

In a saucepan, combine sugar and milk, and let it simmer for few minutes, Meanwhile dissolve the corn flower in 3 tbsp of water and slowly add it to the milk while you´re stirring.
Keep stirring, until the mixture thickens and covers the back of a spoon. This will take few minutes, don´t stop stirring to prevent any lumbs from forming.
Add the orange and rose water mix and turn off the heat. Pour the mixture over the bread, leave it to cool then place it in the fridge for at least 4 hours!
You will end up with 1 cm layer of bread and about 3 to 4 cm cream layer!


To achieve this presentation, I covered the  bottom of a spring form pan with parchment paper, and the borders with acetate paper which makes removing the cold cake a lot easier.
Decorate as you wish, traditionally it is covered with grated pistachios but feel free to  use any other nut or edible rose leaves. I decorated it with pistachios  and added a rose on the biggest cake, as it is the symbol of Saint Rita!


Once it´s cold you just need to cut and serve, you can also prepare it in individual cups.
Hope you give the dessert a try and Happy Saint Rita to all the Ritas out there!


Wednesday, May 11, 2016

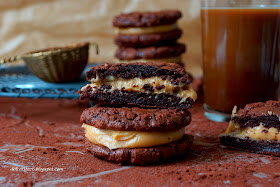
Brownie Cookies with Peanut Butter Filling


Last year's May could not have been any different from the current one. Last year, the weather was warm and towards the end of the month it become seriously hot. The thermometer jumped all the way up to 35 C. As for this year, it´s been raining like crazy. It didn't rain like that even at the height of winter. Though it may sound weird, but I actually enjoy such rainy and cold weather. It invites me to indulge in all sorts of comfort food and especially to bake luscious treats!

The recipe I´m sharing today is one I have been wanting to share for a long time now, but somehow I kept postponing it. With this rainy weather, I think it's the right time to do so. After all, what's better than a chocolaty treat on a rainy day?!


This brownie cookie recipe is inspired by one of Donna Hay's cookie recipes. She filled her brownie cookies with peanut butter and  I really liked the idea. However, I tweaked her recipe using my own version of brownies and filling.

The recipe is really easy and needs few ingredients. So let´s start baking!
For 14 to 15 small cookies you need:
  • 1 egg at room temperature
  • 100 g sugar
  • 1/2 tsp vanilla extract or coffee liqueur 
  • 110 dark chocolate (I used 74%)
  • 20 g butter
  • 1/2 tsp coffee powder
  • 20 g flour
  • 5 g cocoa powder
  • dash of salt
  • 1/8 tsp baking powder (about 1g)
First combine the chocolate and butter and melt in a microwave, or over a double boiler. If melting in a microwave, put them for 30 sec, then stir. Put for an additional 20 sec if not molten. Repeat until all of the chocolate and butter have melted. Finally add the coffee powder.

Combine all the dry ingredients but the sugar in a bowl and set aside.

In a bowl, whisk the egg, sugar and vanilla, until you get a creamy and pale mixture. On a low speed, add the chocolate mixture gradually. When well combined, fold in the flour mixture.


Place the brownie mix in the fridge for 20 min.

On a pan covered with parchment paper, scoop about one tbsp of the mixture (I used a small ice cream scoop) and drop on the pan. With a little pressure, lightly flatten the brownie ball a bit. Make sure to leave enough space between each one, as the cookies witll xpand during baking. Bake in a preheated oven (180 C) for about 8 to 10 min.

Remove the cookies from oven and let them cool for at least 10 min before taking them off the pan.


For the filling you need:
  • 75 g peanut butter
  • 25 g cream cheese (room temperature)
  • 50 g soft butter
  • 50 g powdered sugar
  • 1/2 tsp vanilla extract (optional)
Combine all the ingredients and beat until creamy and fluffy.

Now all you need is to fill the cookies and enjoy with coffee, milk or tea!

These cookies are slightly crunchy on the outside and with a soft and fudgy heart, all chocolate lovers will drool over them; I surely did!