Wednesday, December 23, 2020

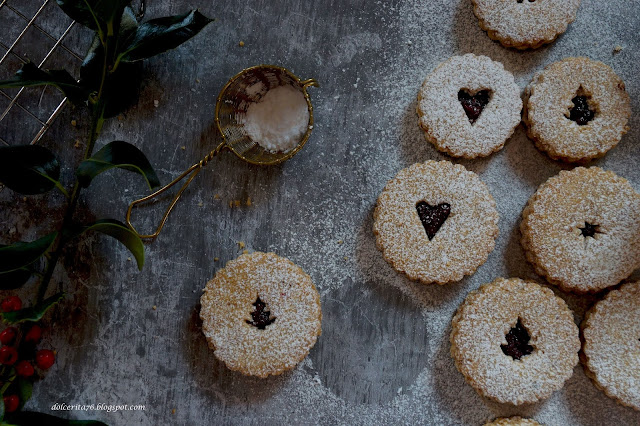
Linzer Cookies, a Rich and Fragrant Christmas Delicacy


A day or so separates from us from Christmas and it surely be one of the most unique Christmas days ever celebrated. For many, it will be spent in isolation or away from loved ones.  In times like these, I think it's best to maintain as much as possible the spirit of this holiday and enjoy it the best way we can. Luckily, there is no shortage of great classic sweets that will can surely lift our mood and spirits. A great example is Linzer cookies, a rich and fragrant treat best enjoyed during the holidays. Now, more than ever, we have the right need to indulge enjoy buttery rich, delicious and comforting baked goods. 

Traditionally these cookies are made from the same dough as Linzer torte. I often make and enjoy this dessert and I bake every now and then. From the Linzer torte to the cookies, you will need few adjustments to make the texture more crumbly and better suited for cookies. 

A short historic background of this recipe: Linz, a beautiful Danubian city, is considered the birth place of the Linzer torte (torte meaning cake in German). This cake is thought to be one the oldest cake recipes known in Europe, going back to 1696, but it seems that some historians found an older recipe from Verona dating back to 1653.


The Linzer torte is a rich cake, full of spices and enticing flavors, all topped with a sweet tangy raspberry jam. The use of spices in sweet recipes is quite common in many parts of Europe, especially in colder European countries. Spices are widely used in Middle-Eastern and Asian countries, but their use is widespread in savory dishes, which is not always the take in traditional European cuisine. It's always interesting to see how different cultures approach and use the same ingredient. Personally, I believe that using spices, especially in desserts, warms the body and uplifts the soul, something that is quite convenient in colder climates with long, dark and cold nights. In all cases, I love spices and welcome their use whenever possible.


For the dough you need (enough for 10 to 12 cookies):
  • 1 cup of toasted ground almonds, or hazelnuts (about 140 g)
  • 1 cup of flour (160 g)
  • 1/4 cup of powdered, granulated or even brown sugar (45 g), if you want the dough to be sweeter you can double the amount
  • 1/2 cup of cold butter (112 g)
  • Zest of half a lime or lemon
  • 1/4 tsp of cinnamon
  • 1/8 tsp of ground cloves
  • 1/8 tsp ground star anise
  • A dash of salt
  • 1 egg yolk
  • 1 tsp vanilla paste
  • Raspberry jam (recipe will follow).
In a food processor combine almonds and sugar, pulse until blended. Add the flour, the spices and the zest, pulse again until well mixed.

Now you can add the butter to the rest of the ingredients in the food processor and pulse until combined or put the mixture into a big bowl and incorporate the butter with the dry ingredients with your hands or a dough blender. When well mixed add the egg yolk and mix until you have a firm non sticky dough.
Wrap it in plastic and leave it in the fridge for about 3 to 4 hours (or even over night).


Take the dough out, and  on a floured surface roll it out for about a 4 or 5 mm thick, cut out the cookies and cut the Linzer eyes in half of them. Once done, put the cookies back to the fridge until firm.
Meanwhile, preheat the oven (160C) , then bake the cookies until the edges are golden brown (about 15 minutes).
Leave to cool completely on a wire rack 

For the jam I used:
  • 170 g raspberry (fresh or frozen)
  • 100 g of sugar (or 170 if you want it sweeter)
  • The seeds of a half vanilla bean
  • Squeeze of a lemon juice (just few drops). 
Combine all ingredients in a heavy bottom pan, when they start to boil and the raspberry starts falling apart, sieve the mixture (it is easier doing it at this stage) then put the jam back to the pan and leave it to simmer for about 20 or 30 minutes until it gets rather thick. 

Now all you need to do is to sandwich the cookies together with the raspberry jam, or any other jam that you prefer. Dust them with some powdered sugar and enjoy them with a cup of coffee or tea. 
 
The cookies are really delicate, crumbly and delicious. They make the perfect Christmas gift to your loved ones, or just gift them to yourselves because you too deserve all the love.
 
Finally, all that's left to say is Merry Christmas! 


Monday, September 7, 2020

Burnt Basque Cheesecake; A Cheesecake Like No Other


This year will definitely will go on record as one of the most difficult humanity has ever faced in recent memory. 

I have used blogging as a tool to explore and elevate my baking skills, interact with like-minded people from across the globe and quite frankly to have some fun. Having said that, I found it pretty difficult to blog this year for the reasons we all know and for personal ones too.  

However, it dawned on me these past weeks that baking has always managed to lift my spirits and helped me to get over whatever life decided to throw at me. So I baked and baked some more and boy have I got some recipes for you! 

I am quite happy to be sharing my first blog for the year with a recipe of a scrumptious cheesecake that will surely wash away all of the year's bitterness and stress with its creaminess and heavenly flavor. 


The recipe I´m sharing is not similar to other cheesecake recipes I have shared before. Here you can check some along with the last one that I shared in the past. These were great in their own right. 

This recipe was developed almost 30 years ago by Chef Santiago Rivera of La ViƱa restaurant in San Sebastian in the Basque region of Spain. 

After testing many cheesecake recipes, he created his own unique take on this ever so popular dessert. The result was an immediate hit and his version is considered by many to be one of the best in Spain and perhaps in the world. I´m sure you must have seen it all over the internet, and the best part is how easy it´s to make! Trust me, give it a try and you won´t be disappointed.  


I have adapted the recipe to my liking, I had to cut down the amount of sugar, used in the original one, and added the enticing flavors of vanilla and lemon zest, but you can add any other aroma you fancy.   

Ingredients:

  • 570g cream cheese at room temperature
  • 4 large eggs
  • 285 heavy cream (35%)
  • 150 g white sugar
  • 9 g corn starch or flour
  • a pinch of salt
  • seeds of  half a vanilla pod 
  • 1 teaspoon of lemon zest. 


First in a bowl, whisk the cheese, sugar, salt,  the eggs, the vanilla and the lemon zest. Then add the flour and whisk again and lastly add the cream and mix to combine. 

Wet a parchment paper, wrinkle it and cover an 18 cm springform pan with the wet paper. 

Pour the batter in the pan and bake in a preheated oven (200-210C) for 30 to 40 minutes. The cake will rise and the surface will take on a  glorious dark brown color. When you take the pan out, the center should remain a bit jiggly, but this is perfectly normal. Please avoid over baking it.

The dark brown top layer is not only visually pleasing, but it also adds sweet caramel notes to the cheesecake, making it extra delicious. 


Once it´s done, put it on a cooling rack, and let it cool completely before you put it in the fridge for at least 4 hours, or overnight for better results. 

Finally, all you have to do is to slice the cake and enjoy it as it is. It really doesn´t need any topping or syrup. Just enjoy the creamy, silky smooth and utterly delicious dessert, one spoonful after the other. 


Monday, December 23, 2019

Pandoro, a Decadent Christmas Cake


Christmas is almost everyone's favorite holiday. It certainly is mine! Beyond the spiritual significance of the occasion, I believe the great appeal of Christmas is its joyful vibe, its spirit of sharing, and its wealth of sweet delicacies.

Typical Christmas desserts vary from one culture to the other, but they all tend to be rich and decadent. 'Tis the season to be jolly... not to worry about the waistline, right? We shall practice self-discipline in the days to follow, but for now let's make a heavenly dessert that hails from the land of a million and one culinary delicacies: Italy.

Pandoro is the typical Christmas dessert of Italy and is pretty similar to the more famous Panettone. These days, you don't have to travel far to get either of these cakes as they are readily available in major supermarkets and good pastry shops. But what if I told you that you can make pandoro at home and it is not as complicated as you might think? Tempting, right?

A bit of history before we tackle the recipe. The origin of pandoro is disputed, but many agree that it originated in the city of Verona. In the past, wealthy Venetian families would decorate the cake with golden leaves, which may account for its name. Luckily, you won't need any expensive ingredient to make this light-as-air cake at home.

The cake does not call for bizzare or exotic ingredients, but it does require some patience, so make sure you're well-stocked in that department. Just follow the steps presented in the recipe below and you'll be rewarded for a cake fit for Christmas or any other celebration.

Please note that the cake requires the preparation of three types of dough. The process is simple, but like I said before, it requires some patience.

(I adopted the recipe from this blog.  I used the same ingredients but reduced the amount of sugar and added 2 extra flavorings to the dough).

All ingredients:
  • 450 strong bread flower (at least 13% protein)
  • 105 g sugar
  • 170 g unsalted butter at room temperature
  • 3 eggs plus 1 egg yolk
  • 60 g lukewarm water or milk
  • 10 g milk
  • 18 fresh yeast
  • seeds of half vanilla bean
  • zest of half lemon
  • 1 tsp dark rum (optional)
  • 1 tsp salt
  • butter to grease the mold
For the preferment:
Mix the egg yolk, 60 g lukewarm water or milk, 15 g yeast, 10 g of sugar and 50 g of flour. Once combined, cover and let it double in volume, which should take an hour to an hour and a half. 

1st dough:
  • 200 g flour
  • 25 g sugar
  • 3 g yeast
  • 30 g  butter
  • 1 egg
  • the preferment
  • 5 g milk
To a mixing bowl, add the preferment, sugar, yeast, milk and egg, and mix with hook attachment on low speed until all ingredients are well incorporated.
Slowly add the flour and keep mixing until the dough is smooth (5 to 10 min) then add the butter and mix again for another 5 minutes. Cover and let it double in size again. The time will depend on the room and dough temperature, so start checking after an hour.

2nd dough:
  • 200 g flour
  • 2 eggs
  • 70 g sugar
  • 1 tsp salt
  • Vanilla
  • Orange zest
  • 1 tsp rum
  • the 1st dough 
  • 5 g of milk
Whisk the eggs with milk and rum. Add the vanilla, salt, zest to the first dough. Now add the egg mixture and start mixing again on low speed.
Start adding the flour slowly and keep mixing for at least 15 minutes. You should get a strong and slightly sticky dough.
Shape the dough into a ball, place it in a greased bowl and let it double in size again. Once it doubles in volume, you need to let the dough rest overnight in the fridge (8 to 12 hours of resting). 

The lamination:
  • The fermented dough 
  • 140 g of  butter
The lamination process consists of incorporating a substantial amount of butter into the rested dough. You can add the butter as one block or as smaller pieces, but the process is the same.

Work the dough with a rolling pin until you get a square of about 30 cm.  Arrange the butter in the middle, fold the corners then roll into a rectangle about 40 to 45 cm long. Fold the bottom to the middle then the top to the middle, like a letter, then rotate 90 degrees, cover and let it rest in the fridge for 15 minutes. (The recipe link has pictures that can help you understand the process better).

Roll again into a rectangle with the seams facing you. Fold again and repeat the process three times resting the dough 15 minutes in the fridge between each fold. When you roll for the last time, let the dough rest on your counter for 15 min. Grease your hands and form the dough into a ball and carefully place in the mold with the seam facing up. Now you need to let the dough rise until it reaches the top of the mold.

Preheat the oven to 170 C and prepare it so it has enough space to account for the rising dough.
Place in the oven and bake for 10 minutes then lower the temperature to 160 C and keep baking for another 30 to 40 minutes. If the top is browning quickly cover it with aluminium foil. To make sure the pandoro is cooked insert a skewer if it comes clean then the cake is done. The cake's internal temperature should be around 90 C, so if you have a suitable thermometer, you can use it to check the cake's readiness.

Let the pandoro rest 5 minutes in the mold then flip it on a cooling rack and let it cool completely.

You can enjoy this brioche like delicacy as it is or you can get creative and serve it with jam, sweet sauces and more.

Buon Natale everyone.

Tuesday, November 26, 2019

Spicy Pumpkin Donuts


After a much-needed break of over a year where I had to care for personal matters, it is time to get back to food blogging. I couldn't be any happier. Food, and especially baking, is not only a hobby for me, but it's a cure, it's cathartic on several levels. I know for a fact that a lot of you are on the same boat. Food drives us and motivates us, it's not just a basic survival need, but it's part of who we are and how we view the world.

While creating this recipe I reconnected with the joy of testing the right combinations of flavor and texture, of styling and photography. Despite the hard work it takes, it is my ultimate comfort zone; the zen space that I cherish the most.


Donuts seem just like a banal dessert that you easily snatch on the go from your favorite "donut" shop. But don't let the humbleness of dessert fool you. If done right, it is a wonderful treat that offers endless customization possibilities. Making donuts at home puts you in full control over the flavor and texture that appeals the most to you.
This particular donut recipe delivers light, pillowy, sweet and mildly spiced donuts that just capture the best fall flavors. What's best is that the recipe makes use of a bountiful ingredient this time of the year: pumpkin. There is no shortage of pumpkin recipes on this blog and this is a welcome addition that I am sure you'll love and enjoy with a warm cup of coffee, perhaps spiked with the wafting aroma of pumpkin pie spice.


For 10 to 12 donuts you need:
  • 300 g flour (I used 150 g bread flour and 150 whole spelt flour, you can use all bread flour if you want)
  • 2 egg yolks
  • 1 to 2 tsp of mixed spices (add the spices you prefer)
  • Zest of half an orange
  • 1/2 tsp vanilla extract or paste
  • 60 g butter, cold or at room temperature
  • 40 g brown sugar (I used coconut sugar and maple sugar)
  • 6 g salt
  • 100 g pumpkin purĆ©e (I make mine)
  • 60 ml of warm milk (37C)
  • 5 g fresh yeast
First, in your mixer bowl, mix the yeast and milk and stir well until it´s dissolved, then add 60 g of flour and mix well. Then add the rest of the flour, cover and let it proof for 30 minutes. This step will make your donuts softer and last longer. Now add all the other ingredients except for the butter, and  with the hook attachment and mix for at least 10 minutes on medium to low speed.

If the dough feels a bit dry, add more milk. Keep in mind that different flours absorb water differently. 

Add the butter and mix again for another 8 to 10 minutes or until your dough is smooth and no longer sticky.

Cover the dough and let it double in volume. This should take around 2 hours.

Now, slowly deflate your dough by bringing the sides to the middle, cover again and put in the fridge overnight. I start working on the dough in the evening, so before I go to bed I just pop it into the fridge and leave it to ferment slowly and develop its beautiful flavors.

The next day , drop the dough on your lightly floured counter, and roll it out to about 1 cm thick.
Using a round cutter, cut the donuts and place them on parchment paper. This is optional, but I usually cut parchment paper squares to fit only one donut as this makes it easier to handle the donuts later on, but you can place all your donuts on a single paper. 

The cut donuts need their final rest to rise and puff. Depending on the warmth of your kitchen, this may take anything from one to two hours. Yup making donuts requires some patience.

Now we're ready for frying. Fill your frying pan with about 2 to 3 cm of vegetable oil and heat it to 180 C. The oil should not be too hot or else the dough will burn on the outside and remain raw in the middle and if it's cold the dough will absorb the oil like a sponge.
Fry the donuts until golden on both sides. Don't forget to flip the dough so both sides have a nice and even color. Placing the donuts on individual parchment papers helps me to place them in the oil directly without losing their shape as the dough is quite fragile when raw. 

Put the fried donuts on absorbing paper to get rid of any excess oil. 

You can simply dust your donuts with simple powdered sugar, or glaze them. Here;s how you do both:

  • Simple sugar glaze: just mix 2 tablespoons of powdered sugar with a 1 tsp of cinnamon. 
  • Maple glaze:  mix 2 tablespoons of maple syrup and add enough powdered sugar until you get the desired consistency, which should not be neither too runny nor too thick. 
The donuts should keep well for up to three days but of course they are best fresh.

Enjoy this delicious dessert with its typical autumnal flavors that go so well during Thanksgiving.

Monday, October 22, 2018

Maarouk, the Levantine Brioche


Foodies+ , a G+ community, was more than an online community were we all got together and shared delectable recipes, but it was more like a family were we shared our food cultural heritage and our fondest food memories. It is unfortunate that this wonderful platform will be switched off in August 2019. But for the time being, let's continue to use this platform in the best way we know and keep this community as vibrant as it has always been.

October is "bread month" at Foodies+. A staple for most people across the globe, bread comes in more shapes, forms and tastes than you can think of. My choice to celebrate this theme is a wonderful bread that hails from one of the most ancient cities in the world: Aleppo, Syria. Maarouk, a brioche-like bread, is quite popular in Aleppo all year long, but it is especially popular during Ramadan.

Maarouk has a texture that is quite similar to a good brioche, but the flavor profile is different. While vanilla, and sometimes citrus zest, flavor brioche, maarouk relies on the aromas of anise, fennel and if available mahaleb (a cherry grown for its aromatic kernels)  to get its unique taste.

The process of making maarouk is easy but you need to be patient to get a a very soft and extremely tasty bread. (This one of the endless recipes you can find)

For the dough you need:
  • 250 g bread flour
  • 80 g lukewarm milk (37 C)
  • 8 g fresh yeast or 2,5 g dry yeast
  • 1 egg
  • 30 g sugar
  • 10 g honey
  • 5 g sea salt
  • 1 tsp fennel seeds 
  • 1 tsp anise seeds
  • 1 tsp mahaleb (if available)
  • 100 g soft butter
First crush the salt with the fennel, anise and mahaleb seeds, set aside.

In a bowl combine the milk with the yeast and mix well until dissolved, add 80 g of the flour and mix again, add the rest of the flour over the mixture and cover the bowl and let it rest for half an hour.

Now add all the ingredients but the butter and knead for at least 10 min on a low speed. Once you have an homogeneous  and soft dough start adding the butter piece after piece and knead for 10 more minutes.


Transfer the dough into a clean bowl and let it rise for about 2 hours or until doubled in size. Now bring the sides to the middle, to let out the accumulated gases, cover the bowl and place in the fridge over night or at least 8 hours. I usually prepare the dough at night and leave it to proof in the fridge over night.

In the morning, or after 8 hours, take the dough out of the fridge and cut into pieces, depending on the braid you want to shape. I opted for a 6 strands braid so I divided the dough into 6 pieces about 90 g each. Braid the dough and leave it to rise, it will take between 2 to 3 hours, depending on the room temperature.

Before the maakrouk is almost ready, preheat your oven to 180 C for about 20 min.

Brush the bread with egg wash (1 egg with 1 tsp of milk and a sprinkle of  instant coffee). Leave it to rest 10 min and egg-wash it again, sprinkle sesame seeds or any other seed of your liking and bake for about 25 to 30 min or until golden brown. 

Once baked, place the bread on a cooling rack and brush it with a simple syrup (50 g water, 50 g sugar, few fennel seeds (optional) and few drops of lemon juice) and leave it to cool.

Enjoy a slice of maarouk with some honey, cream cheese, jam, or anyway you like; the options are endless. I personally enjoy this bread in the morning with a dollop of jam and a big warm cup of coffee for some comforting indulgence before the start of a long working day.


The bread will stay soft and delicious for at least 4 days, due to the slow fermentation process.

Insider tip: you can use the dough to make a wonderful stuffed bread perfect for breakfast. Stuff the rested dough with the cheese of your choice, let it proof for the final time, and bake as indicated. 

Monday, August 27, 2018

Torta Caprese Bianca al Limone


Traveling is a great source of renewal and inspiration. If it was possible, I would spend my days traveling and exploring new cultures and the flavors they cherish the most.

Italy is one of my favorite destinations. The food culture there, like the architecture, the nature and the people is vibrant, colorful, and simply amazing. I can never tire of the sights and smells of Italy.

Few weeks ago, I went on a short trip to Naples, Capri and the Amalfi Coast. What a stunner of a region it is!

Capri, an island off the coast of Naples, is a treasure trove of breathtaking sights and enchanting citrus scents. I am no Italy expert, but if you ever plan on visiting this Mediterranean country, Capri should rank pretty high on your list of to visit regions.

Capri is famous for its Torta Caprese, which is an almond-based cake with a moist and a crumbly texture. It dates back to the start of the 20th century, and if you read about its origins you will come across various stories. Irrespective of how it started, the cake is now widely consumed by tourists in Capri and the South of Italy be it in its chocolate (cioccolota) or lemon (limone) variations. Both versions have chocolate but the bianca or white version uses white chocolate.  You can't go with either variation of this delicate almond-based cake, but the lemon flavor won my vote.


If I managed to spike your interest in this famous Italian dessert and you want to bring the bright flavors of Capri to your home, this is what you need to do.  (Note, recipe adapted from here).

Ingredients:
  • 165 g almond flour (I made mine. I soaked the almonds in hot water for few minutes, then in cold water, spread them over a towel to dry then processed them)
  • 100 g fine sugar
  • 40 g corn flour
  • 3 g baking powder
  • 130 g grated white chocolate
  • zest of 2 organic and unwaxed lemons 
  • 30 g olive oil
  • 35 g melted butter
  • 4 eggs at room temperature
  • 2 tbsp limoncello 
  • dash of salt

Method:

In a bowl, mix the almond flour with the sugar, chocolate, salt, baking powder, lemon zest and corn flour.

In another bowl combine the eggs with the limoncello (you can substitute with the same amount of lemon juice) and beat until the batter doubles in volume and becomes pale. Fold in gently the butter and the oil then add the mixture to the flour and mix until well combined.

Pour the batter into a greased pan, covered with parchment paper, and bake for about 30 to 40 minutes in a preheated oven (175C).


Keep in mind that the baking time will vary from one oven to another, the pan size and material. You want the cake to be fully baked but not dry and with a nice brown color. Inset a toothpick in the center of the cake and if it comes out clean, your cake is done. 

The cake batter is rather liquid and during baking the edges may cook faster than the center. To have an even bake, you can use baking strips. Azlin Bloor made this cake and explains how you can prepare homemade baking strips. Her recipe yields a cake with a different texture as the amount of ingredients and method are somewhat different. Nonetheless, both recipes will deliver a scrumptious cake! 


Once baked, leave the cake to cool almost completely before removing it from the pan, then put on a a wire rack to cool completely.

You can serve the cake as it is, but  you can decorate with a dusting of powdered sugar and few fresh fruits to elevate its looks.

All you have to do now is to serve yourself a slice of this torta and enjoy the flavors of sunny Southern Italy.

Sunday, July 1, 2018

Sixth Anniversary Celebrated with a Chocolate and Cherry Cake


Six years! Wow, it seems like yesterday that I started my food blogging journey and I couldn't be happier to celebrate with you my blog's sixth anniversary.

Food bloggers make everything seem effortless. However, behind every single post there's an enormous time invested into perfecting the recipe, styling the food, taking stellar photos, and writing the post among many other big and small steps. It has been a hectic year for me and I did not have enough time to blog as often as I wanted. This made me have a new respect for those who lead very busy lives and yet find the time to inspire us with their wonderful food recipes.

Busy as I am, I could not let this occasion pass unnoticed. The blog's anniversary is the perfect occasion to slow things down, make a wonderful cake and just savor the moment (and the cake of course!).

I am surely not the only one who is a die-hard fanatic of chocolate and fruit combos. For my blog's anniversary, I went for a cherry and chocolate cake and let me tell you that it was as delicious, scrumptious and divine as it can be.

The base of the cake is a simple chocolate sponge as I wanted the filling and the frosting to shine through unhindered. With ingredients like dark chocolate, mascarpone, amarena cherries or Italian sour cherries, you are one step away from perfection.

Although elaborate cakes are usually reserved for special occasions, no occasion is more special than treating yourself or your loved ones with a cake made with delectable ingredients and a whole lot of love!

There are a few steps to making the cake, but they are not complicated. You just need some planning ahead.

Let´s start with the sponge base.
For 4 layers you need (15 cm pan):
  • 4 eggs at room temperature
  • 120 g sugar
  • 90 g pastry flour
  • 30 g cocoa powder
  • 40 g melted butter
  • half tsp salt
  • 2 tbsp kirsch (cherry based brandy, or you can use any other cherry liqueur)
  • 1 tsp vanilla extract


First mix flour, cocoa powder and salt and set aside.

In a bowl, combine eggs, kirsch and vanilla and start beating on a low speed, then slowly increase the speed until the eggs become frothy. Start adding the sugar, and beat for at least 10 minutes or until the batter triples in volume, is pale in color and can hold shape.

Turn off the mixer, and gently fold the flour mixture. Once well combined add the butter and mix carefully.

Grease and line 4 pans. Divide the batter into the pans and bake in a preheated oven  (170 C) for 12 to 15 minutes.

Leave to cool for 5 to 10 minutes then remove from pans and set aside to cool completely, preferably on a wire rack. 

For the mascarpone filling:
  • 250 g mascarpone, at room temperature
  • 100 g soft butter
  • 100 to 150 g powder sugar (adjust to your liking)
  • 30 g amarena cherries syrup (if not available use any other cherry syrup)
Combine the cheese and butter and whisk until well incorporated, add the sugar and mix again, and finally add the syrup and mix for 30 seconds. Put in the fridge to harden. 

For the chocolate ganache:
  • 170 g dark chocolate, chopped
  • 140 g cream, 35%
  • 1 tbsp kirsch or vanilla extract
Heat the cream on a gentle flame and remove it before it boils. Pour over the chopped chocolate, and leave for a couple of minutes. Whisk until you get a smooth ganache. Add the kirsch and mix again.


For the chocolate frosting:
  • 250 g mascarpone at room temperature
  • 170 g of the previously prepared ganache 
  • 40 g powdered sugar
Combine all the ingredients and beat until well combined and fluffy. Refrigerate.


Now that all the elements are ready, it's time to assemble.

Dollop some of the filling on your serving plate and add the first cake layer. Spread  a generous amount of the mascarpone filling over the cake and then add amarena cherries cut in half. You can use fresh cherries if you don't have the amarena ones. Top with another layer cake and repeat the process until you the last cake layer.

With a spatula cover top and sides of the cake with what´s left of the mascarpone cream and refrigerate for half an hour.

Take the cake out of the fridge and cover it with the chocolate frosting. Leave some if you want to decorate with it. 
Once you covered the cake, and decorated it to your liking, add the remaining ganache. If it has set too hard, heat it over simmering water. Pour over the cake and let it drip over.

To add a nice touch, I piped some chocolate frosting around the edge of the cake. I topped the frosting with cherries. Voila, you're done!

What a light and rich cake! It has the perfect level of sweetness and marries beautifully the distinctive flavor of amaerna cherries and the deep notes of chocolate. Seriously, this is a cake you should try! 

Tuesday, June 5, 2018

Rhubarb and Strawberry Pie with Coconut Crumble Topping


As rhubarb has a short seasonal availability and it's not the easiest ingredient to find in Madrid, so whenever it's around, I incorporate it in all sort of recipes. Today's pie is an example of such recipes.
  
Strawberry and rhubarb are a beautiful flavor combination, but  add coconut to the mix and you get something really special.  It´s the first time I try this combination and it surely won´t be the last. It's such a winning combo! Trust me on that, try it and you won't be disappointed. 

This rhubarb and strawberry pie has a flaky yet crunchy crust, a sweet and soft filling with a crumbly coconut topping. Did I convince you? If so, these are the steps you need to make this lovely pie.

For the crust you need: (22 cm pan)
  • 200 g pastry flour
  • 115 g butter
  • 50 g sugar
  • 35 to 45 ml vodka or kirsch
  • dash of salt 
In the food processor, mix flour, sugar and salt, pulse for few seconds to combine, add the butter and pulse a few times to get a sandy mixture. Slowly add the vodka or kirsch; one tablespoon at first then one teaspoon at a time. Each flour has a different absorption capacity, so be careful to avoid having a soggy dough.


Once the dough forms a ball, drop the mixture on the working surface and gather it. Do not over work the dough. Wrap in plastic and let the dough rest in the fridge for at least an hour or overnight.

Once you´re ready to bake, flatten and roll the dough on a floured surface to about half a cm thick and place it in the pie dish. Prick the dough with a fork, cover with baking paper, put some weight over it (beans, rice or ceramic pearls) and blind bake for 10 to 15 min in a preheated oven (180 C). 

Set aside to cool.


For the filling:
  • 3 tbsp of raspberry and rhubarb jam (or any strawberry jam)
  • 125g sliced strawberies
  • 125g sliced rhubarb
  • 50 g sugar (or adjust to your liking)
  • 1 tbsp corn flour
  • seeds of half a vanilla bean 
  • 1/2 tsp orange zest
  • pinch of salt
Mix all ingredients but the jam and leave to macerate for at least 20 minutes. 


For the streusel topping:
  • 25 g cold butter cut into small cubes
  • 25 g sugar
  • 50 g pastry or all purpose flour
  • dash of salt
  • 1 teaspoon vanilla extract
  • 50 g desiccated coconut                                                                                                                  
Combine the sugar, flour, salt and butter using a dough blender or your fingertips. Work quickly as you don´t want to melt the butter. Once you have a sandy mixture add the coconut flakes and vanilla and mix to combine.


Assembly:

Spread the jam over the baked and cooled dough. Add the strawberry and rhubarb mixture (discard the excess liquid) then evenly sprinkle the streusel on top. You can add some extra shaved coconut if you wish.

Bake in a preheated oven (180 C) until the top is golden brown. Leave to cool for at least 20 minutes before serving.

Sprinkle some powdered sugar for an extra nice touch, although not necessary. Serve while still  warm with vanilla ice cream or creme fraiche, some jam and slices of fresh strawberries. 

The combination of these flavors is spot on and will satisfy any pie lover.