Wednesday, November 26, 2014

Cinnamon and orange scented pound cake

Pound cakes must be the easiest cakes to make; with just four key ingredients you have a delightful, tasty and reliable recipe. I have been making pound cakes forever and of course I always add new twist to the base so I don´t get bored.
Now that is colder in Madrid, the pound cakes I make need to have deep warm flavor that suit this weather perfectly. 


I mentioned in previous posts that I love to go on weekends to Madrid's countryside and walk in its forests and explore its charming villages. I usually take some snacks with me as I know I will get hungry and need something to keep me going. On my last visit, I wanted to have a small picnic time, even though it is even colder in the countryside, so I made a heart-warming cake for the occasion.


Thinking of the ingredients that would transform the plain vanilla pound cake wasn't a difficult task. As I am a cinnamon-o-holic, I had to use it to give that depth of flavor and warmth and to complement and freshen up that flavor what better than orange zest? I also added some chooclate drops to round the flavor and give even more depth. Finally, for added texture, I made a nutty, buttery and spicy streusel topping. Heavenly combination.

Now let´s start baking:
For the cake (one small loaf tin)
  • 1 large egg room temperature
  • 60 g sugar
  • 60 g soft butter
  • 60 g flour
  • 2 g baking powder or 1/2 tsp
  • the zest of a small orange
  • 1 tsp cinnamon
  • 20 g chocolate drops
  • dash of salt
For the streusel:
  • 14 g flour
  • 7 g butter
  • 7 g brown sugar
  • 1/2 tsp cinnamon
  • 20 g chopped walnuts

First mix the flour, baking powder and salt and set aside. Cream the butter with sugar, cinnamon and orange zest, I do it by hand using a rubber spatula, you can use an electric mixer but I don´t bother, especially when it's only a small quantity. When well combined add the egg and mix well. Fold in  the flour mixture and lastly the chocolate drops.
Quickly prepare the streusel by mixing all the ingredients save for the walnuts. Use the tip of your fingers or a fork to incorporate the butter into the dry ingredients. When well combined add the walnuts. 
Sprinkle the streusel on the top of the batter and bake for about 25 to 30 min in a preheated oven (180 C or 350 F).

That mini cake made that day warm despite of the cold and the snow in the high mountains nearby. The day was perfect, the cake was just right and the colors of the surrounding nature were outstanding. The only downside was the windy weather which made the cold feel even colder. I had to quickly wrap up and head back to Madrid enjoying the good time spent there and the few pictures I managed to take before my hands froze, but it was worth it!

Wednesday, November 19, 2014

Chocolate and buttermilk cake with creamcheese and dulce de leche frosting


I have declared my love for autumn so many times on this blog, and I will do it again and again! This year autumn made a late appearance in Madrid but it´s finally here! Rain, cold weather, falling leaves, time for soups and comfort food; now what´s more comforting than chocolate?
My cupboards are full of chocolate: dark, milk, white and all sorts of chocolate combinations!


Buttermilk is another ingredient that I really love, it gives baking goods such a light and wonderful texture, so this time I decided to use chocolate and buttermilk in a cake and the result was wonderful, just as I wanted.


The cake has a deep chocolate flavor and on a textural level it is crumbly, fluffy and soft. It could be enjoyed simply with some dusting sugar or cocoa powder or you can spice it up and add some whipped cream or some frosting and that´s what I did.

I have a jar of dulce de leche that has been sitting around in the cupboard for a couple of months and it was the time to use it along with my go-to choice of frosting: cream cheese.

So these are the basic ingredients and inspirations behind this cake.


For the cake you need (makes 4  layers using 13 cm pans but I only used 3 layers):
  • 2 eggs room temperature
  • 100 g melted butter
  • 105 g melted dark chocolate (I used 70%)
  • 130 g brown sugar, (I have been using panela sugar lately)
  • 120 g flour
  • 5 g of baking power and 2 g of baking soda
  • 1 tsp vanilla extract
  • 1 tsp coffee liqueur (optional)
  • 20 g cocoa powder
  • 145 g buttermilk
  • dash of salt 

For the frosting:
  • 250 g cream cheese room temperature
  • 100 g soft butter
  • 50 g brown sugar
  • 100 g dulce de leche
  • 1 tsp vanilla extract or paste


For the sponge cake, first combine all the dry ingredient, mix well and set aside. Beat the eggs with the vanilla and slowly start adding the sugar. Keep beating until the egg mixture doubles in volume and becomes rather thick, then add  the coffee liqueur if you decided to use it. 

Add the chocolate and mix at low speed. Turn off the mixer. Add the butter and mix at low speed, till well combined, fold in the flour mixture using a spatula, then slowly mix the buttermilk, again using a spatula.

Pour the batter into 4 greased and lined pans (about 13 cm) bake in a preheated oven (180 C) for about 20 min. 

If you don't have enough pans, you can prepare enough batter for 2 pans (split the ingredients by two) and then while the first batch is baking prepare the second one for baking. 


Take the cakes out of the oven and let them cool. You can make the cake a day or 2 in advance and then frost them on the day the cake will be served. 

To make the frosting, start mixing the butter and cream cheese, when well combined add the rest of the ingredients and beat till fluffy and lighter in color! Make sure the butter and cream cheese are at room temperature when you want to make this frosting, otherwise the ingredients will never mix well and the frosting will be very lumpy. 


To assemble, just smear some dulce de leche onto  each of the cake layers. Follow with a healthy dose of cream cheese frosting. Decorate the top layer as you like. Make it as simple or as elaborate as you wish! Enjoy!


Wednesday, October 29, 2014

Spicy Pumpkin Cookies, a Treat for Halloween


Pumpkins are now officially a culinary obsession of mine. Although nowadays it's readily available your long, it's mostly in autumn that I like to buy it every time I go food shopping. 
Once home, I roast pumpkins and divide them into small portions. I use what I need and freeze the rest for later. Roasting pumpkins really brings out their natural sweetness and imparts a delicate smoky flavor to their flesh. I puree the roasted pumpkin and use them in as much recipes as possible. 


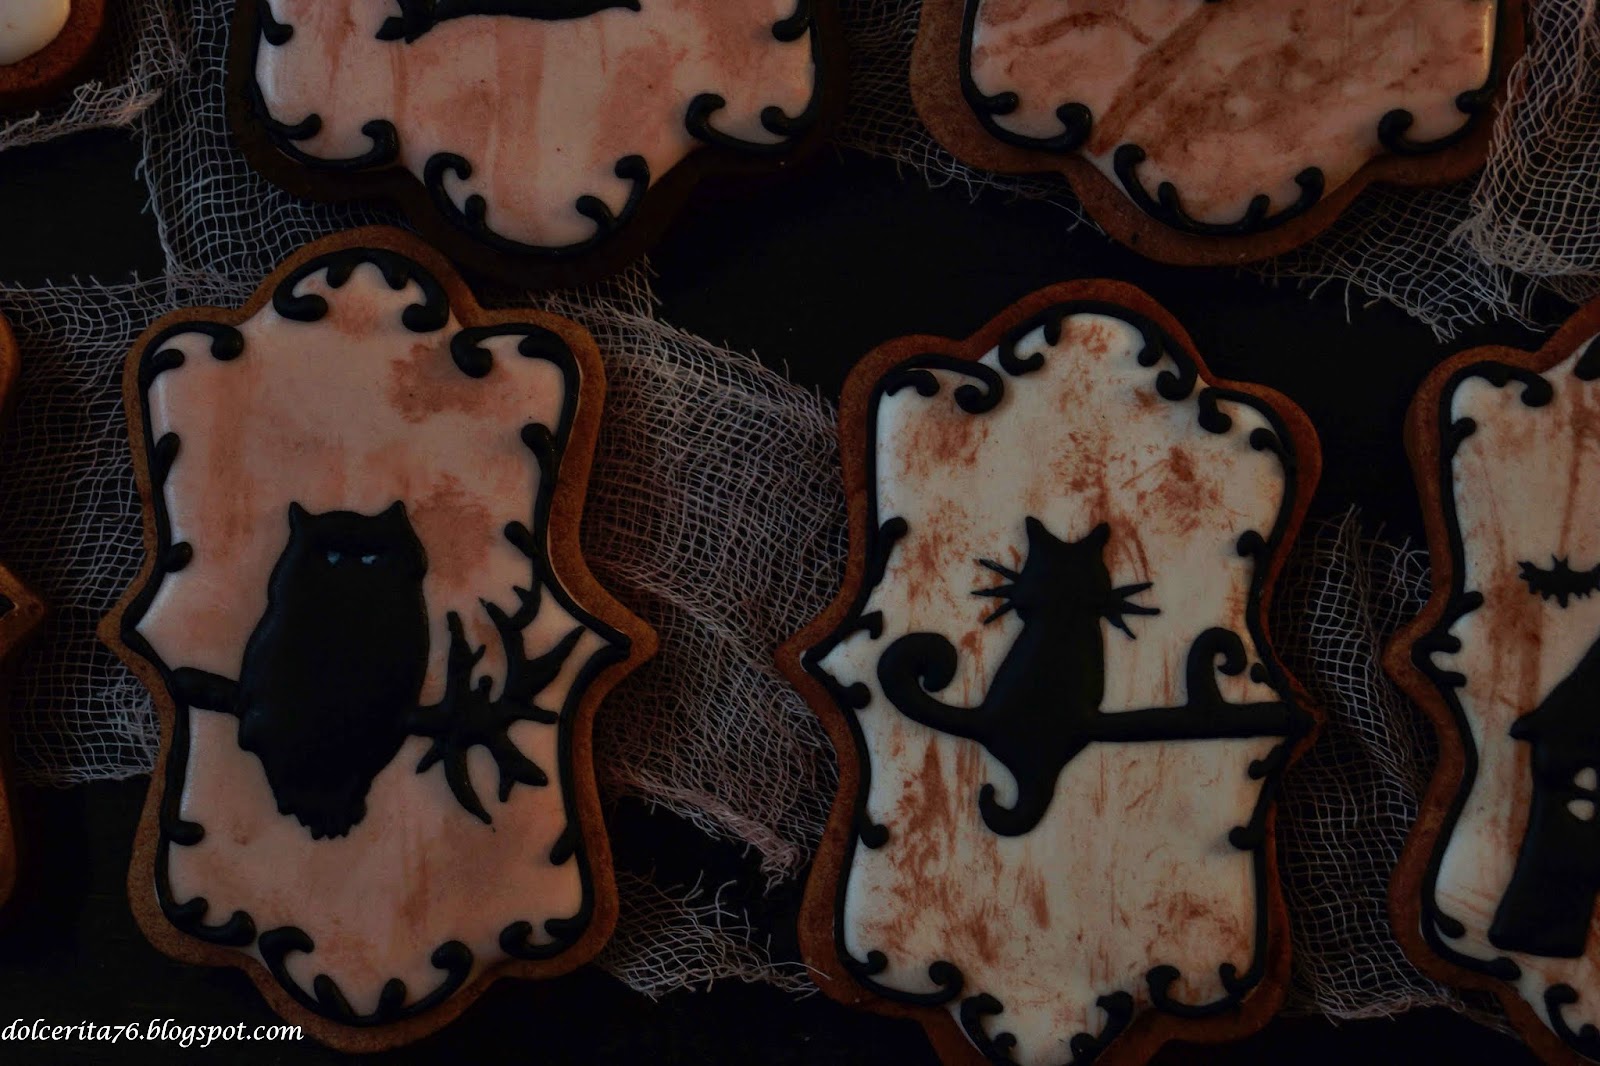
This time, I wanted to use pumpkin in a sweet treat specially made for Halloween. The pumpkin flavored sugar cookies will be decorated and themed to fit for this special holiday, I love decorating cookies but I don't always have the time to do so, this occasion gave me enough motivation to get back to do what I really enjoy doing. 


Getting the cookie the perfect shape to be iced and decorated is really a tricky job, especially if you want to modify the ingredients of the basic sugar cookies, which I intended to do! 

I headed to the kitchen and played around with the basic recipe and luckiIy I got the texture and taste that I wanted. The addition of the pumpkin created a whole new flavor dimension to the cookies and even if you don't want to decorate them, trust me, you will enjoy their taste and I can guarantee that your home will be filled with an enchanting and festive aroma for the whole day!  

Let's get baking!


For the cookies you need:
  • 440 g flour
  • 160 to 180 g panela sugar (I used 160, 180 if you´re not decorating with royal icing)
  • 6 tsps of cocoa powder
  • 1/4 tsp of ground cloves, 1/4 tsp ground star anise, 1/4 tsp grated nutmeg
  • 1/2 to 1 tsp of ground cinnamon (to your liking)
  • dash of salt
  • 180 g  of butter, room temperature
  • 1 egg at room temperature (you need a small egg or 50 g of a larger one)
  • 60 g roasted pumpkin purée
Start by sifting the flour, cocoa powder, spices and salt and set aside. 
With a paddle attachment (if you don´t have one use whisks) beat the butter for a minute, add the sugar and the pumpkin purée, beat for 2 or 3 min until well combined. Add the egg and beat again for just a couple of minutes.

Add the flour mixture, and mix just a little bit at a low speed and stop even if not all the flour is combined. Drop the dough over a clean working surface and gently knead until the dough comes together.

Form your well combined dough into a 2 cm (just over 3/4 of an inch) thick rectangle  and wrap it with plastic film or put in a ziplock bag and leave in the fridge for at least 4 hours or over night.

Cut your cookies using the shapes and molds you like and bake them for about 10 to 15 min in a preheated oven (180). The baking time will depend on the thickness and the size of the cookies! Keep an eye on them and bake them until the edge is slightly golden. 


If you want to decorate these cookies in a more elaborate way then follow the steps I explained in the chocolate cookies post I made for Easter!

For this occasion, I opted for a simpler decoration, I pipped the silhouettes with  royal icing and added black filigree on the edges for a dramatic finish. To give the iced cookies a vintage and darker look I used cocoa powder brushed gently over the surface of the iced cookies.  

Happy Halloween everybody!

Thursday, October 23, 2014

Wild Blackberries Pie


Madrid is just beautiful in Autumn, the weather is perfect, the colors of the city start changing to offer  beautiful scenes throughout its streets and especially in its numerous parks. To top that, just few kilometers outside of Madrid you can explore the most amazing villages and mountains dotted with beautiful forests, rolling hills and much more. Pines, oaks, chestnuts  are some of the many trees you would find there, even more, scattered throughout these villages and forests you find lovely blackberry bushes. Blackberries are not only beautiful to look at but they have a unique acid flavor that's quite addictive. Picking them from the wild brings back many of my favorite childhood memories.


Not far from Madrid there's a small village by the name of Rascafria. Blackberries there seem to ripen later in the season and I couldn't pick any fruits until the first week of October. The first batches I picked were consumed fresh, as they were pretty hard to resist, however, I picked some more to use in a delicious and easy to make pie.


To make this pie you need a really nice and flaky pie dough and two main ingredients for the filling, that's it!
If you're feeling lazy or don't have enough time, you can buy a ready-made pie crust, but make sure that it is made with butter! However, once you master the art of making a good flaky pie crust you can never be satisfied with bought ones. Often, I make more dough than I need and I freeze the rest to be used later on.

For the crust you need
  • 400 g flour
  • 220 g very cold butter, cubed
  • 2 tbsp sugar
  • A pinch of salt
  • Ice water, between 4 to 6 tbsp   
To get a flaky and delicious crust you need to work with  ingredients that are really cold. I start by mixing the dry ingredients in the food processor and place the container in the freezer for about 20 to 30 minutes. You can omit this step, I have done so in the past and have gotten very good results, but it is worth the time investment as the dough will be even more crumbly and flaky when all ingredients are cold. Meanwhile, prepare the butter by cutting it into small cubes and then freeze them until they are very firm.
I then take out my ingredients from the freezer, add the butter to the flour mix and pulse for about 30 sec to one min maximum. Then I add the icy cold water, one tbsp at a time. This is where you need to be careful not to add too much water and not to overwork your dough. Once the dough just barely comes together stop mixing. It is acceptable if the dough does not come together in a single ball, that's not the aim.
Now, line a clean working surface with cling film (or aluminum foil if you prefer), remove the dough from the food processor onto the cling film. Work the dough slightly with your hands so it comes together and shape it into a disk. Cover it with the cling film and place it in the fridge for at least an hour. It is better if you prepare the dough one day ahead, which is what I usually do.
The amount of water that you will add depends on the quality of the flour and the water contained in the butter. Don't be tempted to put more water as the dough might seem dry at first, but when it rests in the fridge, it comes together nicely and the butter is absorbed  by the flour.


Now that you have the dough, it's time to prepare the filling and for it you need:
  • 300 g wild blackberries (or any other berries you prefer)
  • 60 g sugar (I don't like the filling to be too sweet, but if you want it to be sweeter, add more sugar)
  • The seeds of a vanilla pod or 1 tsp of vanilla extract
  • a dash of cinnamon (optional)
  • Cream and sugar for the top
Once you have all your ingredients ready, just mix together and you're done, the filling is ready to be poured into the pie shell.

Remove the pie dough from the fridge 10 to 15 min before you start working with it. Cut it into two portions, with a bigger one for the base and a smaller portion for the top. Roll out the base portion out until it's 6mm thick and it's big enough to cover the pie pan. Pour the fruit mix into the pan.

For the top layer, you can roll it into one single layer or you can get creative and create a lace effect like I did and cut some pie into nice leaf shape. Whatever design you might do, don't forget to leave enough room for the steam from the cooking fruits to escape or else the pie would be too wet.

Finally, brush the crust  with cream then sprinkle with sugar for  extra crunch!

Bake the pie in a preheated oven (180) for at least 40 minutes. Note that the top will bake faster than the bottom of the pie that's why cover the top with aluminium foil, and remove it after 20 to 30 min
of baking.

Serve the pie with some whipped cream and a sprinkle of cinnamon! Enjoy!

Wednesday, October 15, 2014

Spicy caramel and maple apple cake


Summer does fly by. Adios vacations, bright sun, sandy beaches and the great outdoors. Autumn is back, Madrid is getting cooler. The first rains and the amazing colors of trees as they change from dark green to pale yellow and fiery red announce the creeping winter. But I love autumn, its wonderful sights, the smell of fresh earth after the rains and especially I love its delicious fruits. Without a doubt, apples are the quintessential late summer early fall fruit. Although I love eating fresh apples, I do think that this fruit in particular tastes even better when cooked especially if combined to certain spices that bring out the best in apples.


This autumnal recipe features apples as a key ingredient. I was lucky enough to have had the chance to pick apples fresh from an orchard close by to where I live. These were small fruits, packed with flavor and tart. They stay firm when cooked which was what I exactly wanted. The hardest part of this whole operation was peeling and cutting the fruits. 

For this recipe using an 18 cm pan you need:

To prepare the apples:
  • 200 g of apples peeled, cored and cut into cubes
  • 30 g sugar
  • 1 tbsp maple syrup
  • 15 g butter
  • 1 tsp cinnamon
  • 1/4 tsp of ground cloves and 1/4 tsp ground star anise and some grated nutmeg

Combine all ingredients in a pan, and cook the apples over a medium flame until slightly tender and caramelized.Set aside to cool.


To prepare the cake:
  • 2 large eggs (room temperature)
  • 60 g of sugar (if you´re not going to top the cake with caramel double the amount of sugar)
  • 60 ml of vegetable oil (I used sunflower, but any neutral vegetable oil will do)
  • 170 g of flour (I used full grain spelt flour)
  •  tsp and  half  baking powder
  •  tsp of maple syrup and 1 tbsp of caramel sauce (or 2 tbsp of maple)
  •  tsp of cinnamon
  •  tsp vanilla essence
  • 100 g of the cooked apples
  • pinch of salt
  • greased and dusted 18 cm pan
  • 1 tbsp caramel to drizzle on top


Combine the flour, cinnamon, salt and baking powder and set aside. Whisk the oil with the sugar for a minute, add the eggs one by one and when well combined add the maple syrup and caramel. Finally fold in the flour mixture. When all the ingredients come together, pour the batter in the prepared pan, add the cooked apples on top and sprinkle the tbsp of the cramel on them. You  can mix the apples with the batter if you want. Bake the cake in a preheated oven (180C) for 25 to 30 minutes, check with a toothpick to make sure the center is cooked through.


The caramel I used in this cake can be prepared using  this recipe. However, I made just half of the amount and I replaced water with the juice released from the cooked apples infused with the spices, and let me tell you, the result was out of this world.

Serve the cake with the rest of the cooked apples with a drizzle of caramel and enjoy a sweet taste of autumn!

Wednesday, September 24, 2014

A journey into the 1001 Arabian Nights world of sweets and a recipe: Hays cookies

Two years ago I started this blog and a whole world opened up for me on the internet. I discovered  new ingredients, amazing techniques but above connected with amazing people who are fond of food and gastronomy like myself.

On Google Plus I´m an active member of several food communities, one of them is called Foodies, a very active community where I met amazing people. Foodies feature a monthly theme and this month's theme is "Cook A Book" where you have to share a recipe that you have read in a book be it a recipes book or a novel. I really liked the idea but finding that specific recipe you really wanted to share was quite challenging.
I thought really and in my mind came images from the world famous ancient book of 1001 Arabian Nights. It's a book that described with vivid imagination the world during those fabled times. Of course, the book drew upon the lives of ordinary people and featuring several aspects of their living, including the foods they enjoyed and the sweets they craved for.It this this enchanted world of love and intrigue, of djinnis and flying carpets, of Shehrezade and Aladdin that inspired me to make this recipe.


The 1001 tales offered an insight into the amazing foods the heroes of the plots enjoyed. Delicious ingredients like dates, figs, all kind of tasty nuts, honey and also the amazing world of aromatic spices like cardamom, cinnamon and much more were the basis of the food featured in the tales and the staple of much modern Middle Eastern cuisine.

After some research I decided to make a recipe I've never heard about before:unbaked cookies called Hays. As much as I love baking, but the chance any time I steer away from the oven is pleasant and even magical like the Arabian Nights tales.
The cookies featured in this recipe are so simple to make but I guarantee the result will amaze you as it amazed me. They are packed full with the flavor of nuts, honey and spices. What more can you ask for?

For these nuts cookies you need:
  • 30 g pistachios
  • 30 g almonds
  • 40 g  bread crumbs or cookies crumbs
  • 1/2 tsp of cinnamon
  • 20 to 30 g brown sugar (I used panela)
  • 1/2 tsp of honey
  • 15 g of butter
  • Few drops of rose water
  • A pinch of grated nutmeg
In a food processor combine all the ingredients except for the honey and butter. Process until you get the consistency of fine crumbs. Add the honey and mix and finally add the butter and mix until well combined.

With a small spoon form quenelles with the cookie dough, just fill the spoon and press it againt your palm then carefully release the cookie on wax or parchment paper. You can make different shapes if you want.
Once finished forming your cookies, put them in the fridge for at least half an hour before you serve them.

Try these cookies with a cup of minted tea or coffee and enjoy a trip to culinary wonderland where you  imagine yourself hovering atop of a magic carpet cruising over the gold and white castles of ancient Baghdad and Damascus!

Tuesday, September 16, 2014

Deep Scarlet Red Summer Popsicles

As summer nears its end, its great to indulge in the special moments it gives us. What better way to celebrate vibrant summer flavors than to enjoy delicious deep red sweet and tart popsicles?

Like many of  you, I consider popsicles as the best companion for hot summer days. Forget about those commercial popsicles loaded with artificial flavors, colorings and are way too sugary; popsicles are easy to make at home and you control what goes in. The end result will definitely please you.

The popsicles featured in this recipe combine the robust, fruity, refreshing and fragrant flavors of lemon, blueberries and lavender.

To make 8 popsicles (70 ml approximately each) you need:
  • 300 g blueberries
  • 1 tbsp of sugar
  • 250 ml lemon juice
  • Simple syrup (recipe follows)

First put the blueberries in a pan with one tablespoon of sugar and leave it to heat over a low flame. When the berries ooze out their juice, remove them from the heat and set aside to cool. Using a hand-held blender (or a regular one) I mixed the blueberries until smooth. You can pass the mix through a sieve to remove the seeds and the peel if you are picky, but honestly I didn't bother as I like the added texture they give. 


For the syrup you need:
  • 100 ml water
  • 130 g sugar
  • 1 tsp lavender
  • 1 small slice of lemon peel and a squeeze of lemon juice

First heat the water, add the lavender and leave it to steep. Now combine the sugar with water, add the lemon peel and let it simmer on a low heat. When the syrup bubbles vigorously  add a squeeze of lemon juice and turn off the heat. Leave to cool a bit.


Now that you have all the ingredients ready, you just need to combine them and mix.

Pour the liquid in the popsicles molds and put in the freezer to set for not less than 4 hours.

Savor these delicious ice pops on a warm summer night, close your eyes and enjoy the explosion of summer flavors.


Wednesday, September 3, 2014

Chocolate and Walnut muffin Heaven!


Chocolate is of course one of the most popular flavors in desserts and its not hard to know why. The depth of flavor chocolate imparts to sweets is hardly rivaled by any other ingredient. The flavor of chocolate is made even more sensational by pairing with nuts that, especially when toasted, add a penetrating rich buttery flavor that goes so well with chocolate.

Muffins are one of the joys of baking. They are extremely versatile, a snap to make, both savory and sweet. I had some leftover walnuts so I decided to use them with chocolate to make a wonderfully easy yet incredibly delicious muffins.

For 5 to 6 muffins you need:
  • 1 large egg (room temperature)
  • 35 g melted butter
  • 20 g melted chocolate
  • 75 g brown sugar (this quantity is a minimum you can add more if you like a sweeter result)
  • 50 g flour (I used whole grain barley flour)
  • 10 g cocoa powder
  • 40 g ground toasted walnuts
  • 4 g of baking powder
  • 50 ml milk
  • One tsp vanilla essence (I also added some coffee liquor)
  • Dash of salt
  • 1/2 tsp of cinnamon (optional)

First combine the combine flour, cocoa powder, baking powder, salt, cinnamon (if using) and walnuts mix and set aside.
In a bowl, whisk the butter and the melted chocolate with the sugar, add the egg and mix until well combined.


Add 1/3 of the flour mixture mix then add half of the milk and combine, add another 1/3 of the flour, mix then follow by the rest of the milk and finish by adding the remaining flour. 

Pour the mixture into your muffin tins, you can add some chopped walnuts on the top, and bake them in a preheated over (between 180 to 200C) for 20 to 25 min.
Those muffins didn't rise too high because I filled just about more of the half of the muffin cups, but you can fill them almost to the top if you want them higher.


The time of the baking will vary from one oven to another, so check them after 15 min, if they spring back when touched then they are done!

These muffins are rich, dense and crumbly perfect. They are perfect for chocolate and nuts lovers. Give them a try and I am sure you will like them.