Monday, January 25, 2016

The Ultimate Cinnamon and Caramel Cheesecake!


It's not a secret why cheesecakes are the ultimate desserts for so many people. They are creamy, sweet and can be varied quite substantially to meet just about any taste. I always enjoy a good cheesecake with a cup of coffee or by itself. When I am short on time I prepare the non-baked versions, even though I have a preference for the baked ones. However the last time I baked a good New York style cheesecake was when I shared this post. I think it´s about time I make a new one. 

The idea for this recipe has been on my mind for quite a while but I always managed to postpone it. The idea came to me while savoring the delicious caramel cookies also known as speculoos or speculaas. These biscuits, now popular worldwide, originate from Belgium and the Netherlands. Nowadays, one can find spread made from these cookies and I am a big fan! 


For this recipe I used both the cookies to make the base and the spread to flavor the cheese filling. The result is simply amazing and to make even more special, I decided to top the cheesecake with a special caramel sauce that complements the flavors found within the cake itself. 

And now let´s get baking!

For the base you need:
  • 100 g caramel cookies (I used the Lotus brand)
  • 20 g melted butter 
To prepare the cookies place them in a zip-lock bag and pass a rolling pin over them as many times as you need until you end up with a coarsely textured crumbs. Place the pulverized cookies in a  spring-form pan (18 cm) greased covered with parchment paper. Add the melted butter and  mix well then press the mixture to cover the bottom, you can add more cookies to form a rim on the sides of the pan, I didn´t this time. Bake in a preheated oven (180 C) for 8 to 10 min. Leave to cool.


For the cheesecake mix:
  • 600 g cream-cheese at room temperature
  • 3 large eggs at room temperature 
  • 100 g Greek yogurt (or thick yogurt, or sour cream)
  • 130 g sugar
  • 1 tbsp flour 
  • 100 g caramelized biscuits spread (Lotus Biscoff)
  • dash of salt
  • 1/2 tsp vanilla essence
  • 1/2 to 1 tsp cinnamon (to your liking)
In your mixer bowl, add the cheese and mix on a low speed with the paddle attachment for 2 to 3 minutes. Then add the sugar, the Biscoff spread, yogurt, cinnamon and flour and mix again until well blended and no lumps are visible. Add the eggs one by one and keep mixing on a low speed. Finally add the salt and vanilla and mix a bit. 


Pour the batter in the pan, and bake in a preheated oven (150 to 160 C). 

Usually it's customary to wrap the spring-form pan with aluminum foil and place it in another pan filled with warm water and then bake for the required time which is usually for a pan of this size one hour to one hour and a half (oven-dependent).  This bain-marie method of cooking is needed to bake your cake at a gentler heat to avoid surface cracks.


What I did is different though. I put in the middle layer of the oven a pan and filled it with warm water then placed the cheesecake pan over a cookie sheet and put both over the pan. This created  a steamy environment in my oven and allowed the cheesecake to cook all the way through while retaining a smooth creamy texture and most importantly with no surface cracks whatsoever.

After one hour, turn off your oven, shake the tray, make sure the middle is still wiggly and leave the oven door cracked open for another half an hour to an hour. 
Let it cool completely before you put it in the fridge overnight. 


For the caramel you need:
  • 100 g sugar (50 g white sugar, 50 g dark brown sugar)
  • 40 g cold butter
  • 150 ml cream (35%)
  • 1/4 tsp of sea salt
  • 1/2 tsp cinnamon
Make the caramel following the instructions in this post, and just add the cinnamon with the salt and you´re done. Before serving the cheesecake, drizzle the caramel over, and feel free to drizzle more on your piece.

If you love a creamy baked cheesecake but wish for a new flavor then this recipe is for you and for all cheesecake lovers and boy there are so many of us out there!


Sunday, January 17, 2016

Tangarine and Cardamom Cake


The long needed Christmas and New Year's vacations are long over and we are now back to our daily routines. Madrid post-vacation is cold and wintery and I couldn't be happier as I love this kind of weather. For me this weather is synonymous with a laid back routine with time spent indoors seeking the comfort of a warm bed or the joy and warmth baking provides.


Speaking of comfort, what´s more comforting than a piece of cake with a hot cup of coffee or tea eaten alone or shared with close friends when it's raining outside.

I often combine the flavor of fruits with that of spices and there are combinations that work better than others. Cardamom and citrus is a winning combination that I often use in my baking. I would usually use oranges but this time I decided to change and try out tangerines. The result was just perfect.
With a strong flavor base and few key ingredients this cake is really easy to make and is perfect in the morning, afternoon or for these guilty moments of late night snacking.


The follwing ingredients are enough for a high cake using a 15cm cake pan, but 18 or 23 cm pans can aslo be used however you need to reduce the baking time.

For the cake you need:
  • 2 large eggs at room temperature
  • 100 g sugar
  • 160 g flour
  • 100 g tangerine purée (recipe follows)
  • 50 g yogurt
  • 1 tsp ground cardamom
  • 70 melted butter
  • 1 tsp baking powder and 1/4 tsp baking soda
  • 1 tsp cointreau (optional)
  • pinch of salt
To make the tangerine purée just place 100 g of tangerine in a saucepan and cover with cold water and cook for about 20 minutes or until tender. Cool down, remove the pits (if present) and just process into purée.


To make the cake, combine flour, baking powder and soda, cardamom and salt in a bowl and set aside.
In another bowl, whisk the eggs with the cointreau then add the sugar gradually. Keep whisking until you have a pale and creamy mixture. Lower the speed of the mixer and add the melted butter, then the yogurt and the purée.
Turn off the mixer and fold in the flour mixture with a spatula or a large spoon.
Pour the batter in a greased pan and bake in a preheated oven (175C) for about 30-35 min or until a skewer inserted in the center of the cake comes out clean.


You can serve the cake as it is, or you can add a simple frosting, by combining powdered sugar and some tangerine juice!

The vibrant and warm flavors of the cake are like a ray of sunshine in these wintery days, just what you need!

Wednesday, December 30, 2015

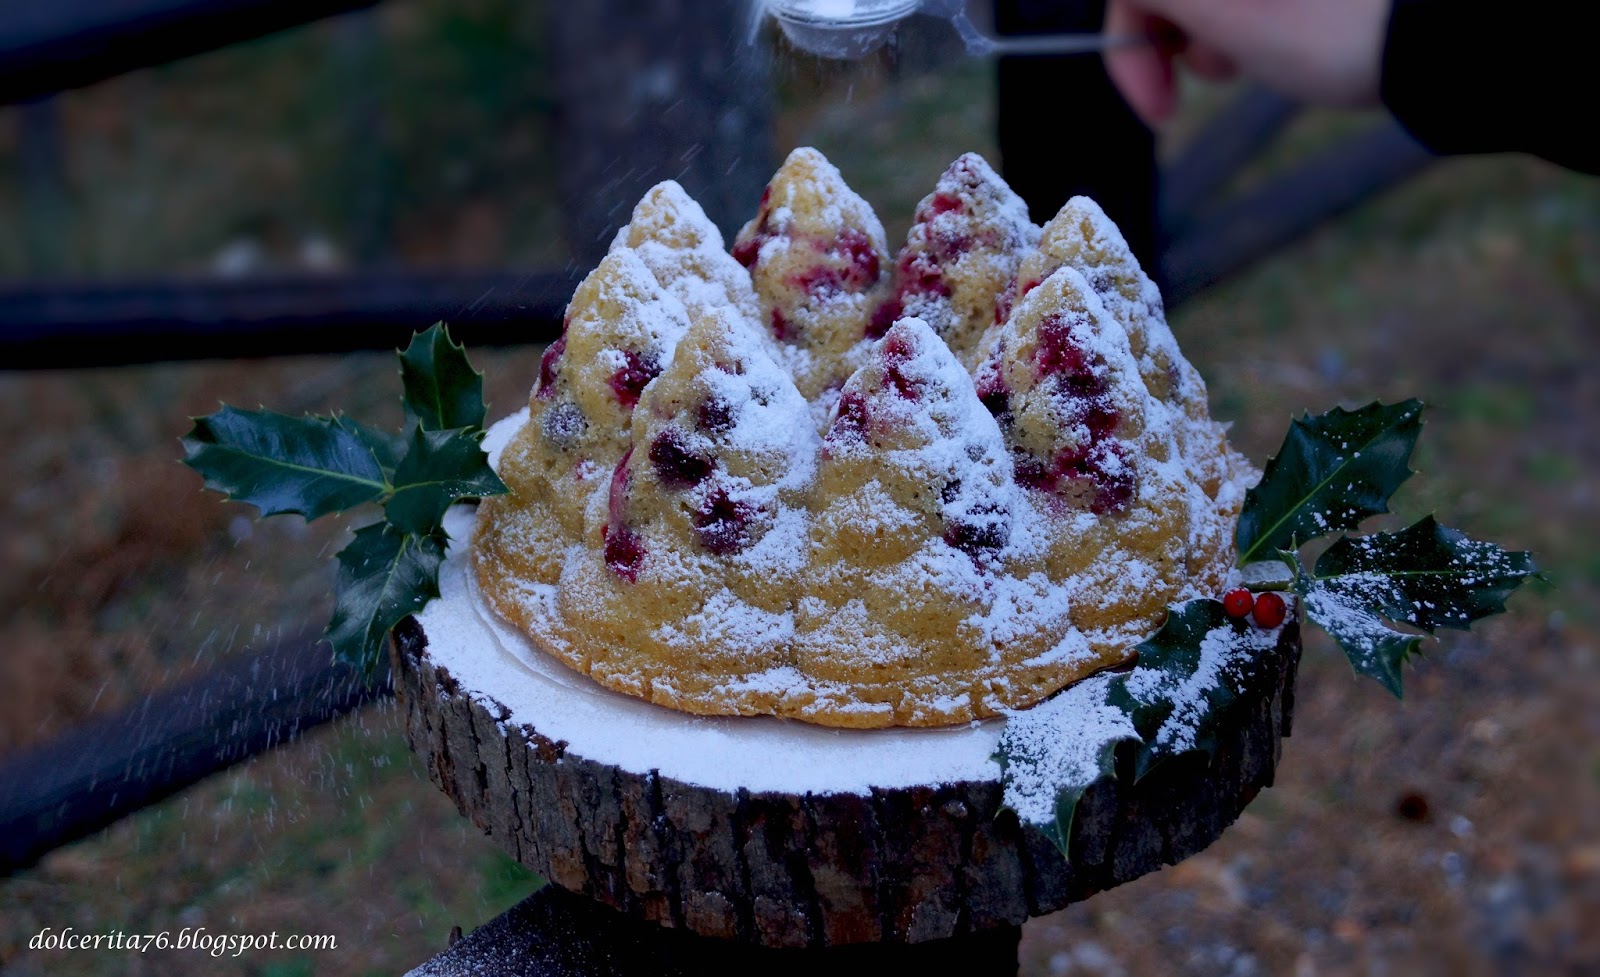
Roasted Cranberries Bundt Cake!

The year 2016 is only one day away. Time surely flies by. What an exciting year 2015 was for me! I learned a lot of new recipes, experienced new flavor combinations and new methods of cooking. It is only fitting to say goodbye to this year in baking style!

The last bake of this season had to be beautiful and featuring the season's colors and flavors. It  had to be easy to make too as no one wants to be tied down to the kitchen during these festive times! My answer to all of this was a roasted cranberries cake baked in a beautiful bundt mold.


To make this cake you need to start with its flavor base: the roasted cranberry sauce. The process is really straightforward, you just need to get the ingredients and combine them together. For this you will need:
  • 125 fresh cranberries
  • 1 tbsp brown sugar
  • 2 tbsp maple syrup
  • 1 cm of ginger, fresh and grated
  • 1/2 tsp ground cinnamon
  • 1/2 tsp ground ginger
  • 2 strips of orange zest
Combine all the ingredients in a pan, and slowly roast them in the oven at 150C for about 20 min. They will be done when your whole house smells like Christmas!
Let the cranberries mix cool down as you prepare the cake mix. 


 For a pine forest mold with 10 cups capacity you will need, :
  • 3 large eggs at room temperature
  • 150 g soft butter
  • 220 g white sugar
  • the cooled roasted cranberries with their juice
  • 220 g cake flour
  • 10 g baking powder
  • 1/2 tsp salt
  • 150 ml whole milk or cream
  • 1 tsp cointreau (optional)


First combine the flour, the salt and the baking powder and set aside.
In a large bowl, beat the butter with the sugar until creamy. Start adding the eggs one by one, making sure the egg combines well with the dough before adding the next one. 
Now add 1/3 of the flour mix, beat until combined then half of the milk and mix again, repeat with another 1/3 of the flour, then the rest of milk and finally the rest of the flour. Finally, gently fold in the cranberries and their juices.

Pour the batter in the greased and floured pan and bake for about 45 to 50 min in a preheated oven (175C).


Leave the cake to cool in the pan for around 5 min and then flip it over a cooling rack.

Dust with some powdered sugar and enjoy the deep flavors of this wintery cake!

Finally, I would like to wish everyone a Merry Christmas, yet again, and a very happy new year. May it bring you nothing but joy and loads of sweetness!


Tuesday, December 22, 2015

Salted Caramel Candies, a Great Gift this Christmas!


With this post we will continue the series of festive recipes. However, this is a special recipe since it requires only 4 main ingredients to end up with something really impressive!

If you follow my blog you would know that I do love a good caramel. Added in the right amounts, caramel transforms ordinary sweets into spectacular ones. What if caramel is not one of the elements of a recipe but is the actual hero of it? Well that's what this caramel candies recipe is all about.


Following the recipe specified in this post you will get around 21 pieces of candy. I should specify that I used an 8 x 16 cm cake pan. I trimmed the edges of the caramel and cut it into 2 x 3 cm candies.
The only difficulty in this recipe is to get to the right temperature as to have a set caramel but that is not rock solid and to attain this temperature you do need a thermometer. It sounds a bit technical and it kind of is, but these cooking thermometers are widely available nowadays at fairly reasonable prices.

Now, let´s caramel:
  • 200 g sugar
  • 150 g cream (35%)
  • 40 g cold butter
  • 1/2 tsp sea salt or fleur de sel

In a heavy bottom pan add the sugar and let it melt over a gentle heat. Cook the sugar until you get an amber color and you can smell the distinctive caramel aroma. Slowly pour the cream taking extra care not to splatter any of the hot sugar on you.
Continue cooking the caramel for at least 10 minutes and over a gentle heat. The mixture needs to get to 125C (257 F) and when it does, turn off the heat and add the butter whisking well until it  is well combined. Finally add the salt and whisk again for a bit.

Pour the caramel in the parchment covered pan and leave it to cool. Place the pan in the fridge for an hour or two. 

Remove the pan from the fridge. Take the caramel out of the pan and cut it into 2 x 3 cm rectangles. For an extra hit of salt, you can sprinkle a touch of sea salt on the caramel pieces or over the caramel slab before you cut it.

Wrap the candies in wax paper or candy plastic wraps and share them with your loved ones as a special and homemade gift for Christmas. 

Chocolate Christmas Gifts.


Only a few days separate us from Christmas and the pressure is on! I feel I have a million things to do but I don't have enough time. That's why I decided to prioritize and just stick to the basics, and what's more basic than gifting loved ones on Christmas?
During previous years, I baked batches upon batches of cookies and decorated them. The result was wonderful but really time consuming. This year I decided to make simple yet elegant and delicious gift items. Chocolate was the answer!


One of my favorite flavor combinations is that of orange and chocolate. I have used it before in so many of my recipes and I keep on experimenting with it.  Candied orange peels dipped in dark chocolate, known as orangettes, make the perfect gift item and are the ultimate way to do justice to this amazing food pairing. 

I used 3 medium size oranges  which yielded more than 30 orangettes. This should give you an idea and help you adjust the quantities according to your needs.

As orangettes require only two main ingredients  this means that you need to get both of them right. The candied peels need to be sweet enough, bursting with citrus flavor, and neither too soft nor too thin and dry. The chocolate needs to be tempered just right.

Temper more chocolate than you need. This would give you the opportunity to make another excellent and fast dessert that is also a great gift idea: mendiant. Mendiants are made from chocolate shaped like a disk and topped with dried fruits and nuts.

Now let's get started on making these two delicious and easy to make chocolate specialties.


For the orangettes you need:
  • 3 oranges (pick varieties with a rather thick peel) 
  • water
  • sugar
  • the juice of 1 orange
  • 1 tsp of cointreau (or any other orange liqueur) 
Cut off the head and bottom of the oranges, then cut through the skin to get 4 big segments.

Cover with cold water, heat and when the water starts boiling leave it for 2 min then drain the water and repeat the process for 2 more times. This removes the excess bitterness from the peel but keeps the much loved orange flavor.

After the third boiling, drain the peels and let them cool down. Once cooled, cut them into strips and weigh them. Add the same amount of sugar as the weight of the peels. In my case I added 220 g of white sugar.

Add the orange juice, cointreau and then cover with just enough water to cover the peels.  Cook for about an hour. Leave the peels in the syrup for an additional  hour, or until they cool down completely, then remove them and let them dry for a day over a cooling rack!


Now it's just a matter of dipping the orange strips into the chocolate. I  personally like dark chocolate for this recipe, but you can use the chocolate you prefer. 
Temper the chocolate, with the technique you like. I tempered around 300 g.
Just dip about 3/4 of the orange strip into the dark chocolate  and place them on a parchment paper until they harden. 


For the mendiant:
Spoon some melted and tempered chocolate on a parchement or wax paper, swirl a bit to get a beautiful disk shape then drop the nuts or candied fruits of your choice. Ever so gently press the surface of the nuts and fruits to make sure they stick to the chocolate once it hardens. 

Arrange a collection of orangettes and mendiants in the boxes of your choice to make great gifts for your loved ones during Christmas. 

Sunday, December 6, 2015

Ferrero Rocher Brownies!


We're only just few weeks away from Christmas and I couldn't be any happier! 
Christmas has cast its magical spells all over Madrid. The lights, the special Christmas markets, the masses of crowds shopping and the many little things here and there make this time of the year truly wonderful and my favorite.


Ferrero Rocher chocolates are delicious any time of the year, however, they are definitely more popular during Christmas as they make a really nice and tasty gifts. In preparation for Christmas I bought some boxes and I have to say they do make a fancy addition to the dining room table! As I love mixing and experimenting, I decided to create a special holidays brownies, a posher version if you want, using the delicious Ferrero Rocher chocolate balls. Besides being so popular and delicious brownies are extremely versatile and everyone seems to have a special or favorite recipe. With one star ingredient, this would be my special take on brownies for the holidays. They are definitely more indulgent but still easy to make and bake and above all a joy to share with your loved ones during this season of sharing.  


So let's get started. For 9 generous servings you need:
  • 150 g 72% dark chocolate
  • 120 g unsalted butter
  • 100 g white sugar and 50 g dark brown sugar
  • 50 g flour
  • 2 eggs
  • 10 g cocoa powder
  • dash of salt
  • 1 tsp vanilla extract
  • 1/2 tsp instant coffee
  • 30 g praliné paste


Line a 18 x 18 cm pan with parchment paper. Sift the flour and the cocoa powder and add the salt.

In a double boiler and over a gentle flame, melt the chocolate and butter. Add the instant coffee and the praliné to the melted chocolate and butter mix and combine well until it dissolves. Coffee enhances the flavor of chocolate, but don't add too much as its powerful taste can mask all other flavors!

When the chocolate mixture has cooled, add the sugar followed by the eggs and the vanilla. Mix until everything is combined well. Now add the sifted dry ingredients, and mix well.

Pour the batter into the pan. Add the Ferrero Rocher but don´t put too much. Just make sure each piece of brownies will have one in the middle,  


Bake for about 25 to 30 min in a preheated oven (180C).


Try my Ferrero Rocher brownies for a jazzed up classic suitable for the holiday season. Enjoy!

Thursday, November 26, 2015

A Special Thanksgiving Treat: Nutty Pumpkin Pancakes!


Christmas, my favorite time of the year, is all too near, eventhough it means that the end of Autumn is near, my favorite season with all its colors and flavors.
Thanksgiving, though specific to North America, reminds us just how close Christmas is and incites us to celebrate all the goodness this season has to offer.

I know I will probably sound like a broken record, but I am really nuts about pumpkin especially during this season. I have already shared many recipes featuring pumpkins and I can guarantee that you'll always find the results to be super satisfactory.


Besides trying a variety of sweet and savory recipes using pumpkins, lately I have been experimenting with different types of flours. I have bought chestnut flour and I was eager to try it in a special recipe that would make use of its deeply nutty and sweet flavor. That's why I decided to combine these two earthy ingredients in a special Thanksgiving recipe. And what better way to celebrate this typical North American holiday than with the all time American favorite: pancakes! Interestingly enough, if you omit the toppings I used you will have delicious gluten and lactose free pancakes; a good option for individuals who have allergies to these ingredients.

So let's get ready and make some sweet nutty and spicy pumpkin pancakes!


For 2 servings you will need:
  • 1 egg at room temperature
  • 100 g pmpkin purée
  • 1 tbsp light olive oil (no need for extra virgin) 
  • 2 tbsp maple syrup
  • 50 g apple butter (substitute with an extra 50 g of pumpkin purée if you don't have it)
  • 85 g chestnut flour
  • 15 g roughly chopped pecans
  • 1 tsp baking powder
  • 3/4 tsp cinnamon
  • 1/4 tsp ground ginger
  • 1/4 grated nutmeg
  • dash of salt
Mix the flour, nuts, cinnamon, ginger, baking powder, nutmeg and salt and set aside.
In another recipient blend the egg, oil, maple, pumpkin purée and apple butter until they come together nicely. 
Now you just need to combine the dry and wet ingredients and leave the mixture to rest from 5 to 10 minutes.

Cook the pancakes in a lightly oiled pan until set and cooked through but be careful as you don't want to overcook them.

I served them with some cream cheese and a sprinkle of cinnamon and lots and lots of maple syrup. 


The texture of these pancakes is just wonderful. They are moist, soft and the combination of flavors is comforting and absolutely delicious with a delicate balance between the sweetness, nuttiness and the spiciness.  And should I remind you that they are gluten and lactose free?

Happy Thanksgiving and happy eating!

Saturday, November 14, 2015

Ginger, Orange and Chocolate Bundt Cake with Cointreau Ganache!


The 15th of November is the National Bundt cake day. Bundt pans come in different shapes and sizes but they always produce beautiful looking cakes with minimal efforts from your part. My favorite is the traditional gugelhupf pan. I purchased some Bundt pans a while ago and I felt it's time to put them to good ause nd celebrate the extra something these pans bring to the baking world.


The gugelhufp is perfect for the approaching holiday seasons and it will help you make beautiful cakes, brioches or regular breads. As the idea of the Bundt Day is to encourage people to prepare for the Christmas Holidays, I decided to make a cake using flavors inspired by those common in Christmas desserts. I relied on ginger, orange and chocolate to achieve a beautifully flavored cake. The result is a slightly spicy, refreshing and chocolaty one, with a rich, moist and fudgy texture that can be served as it is with perhaps a light sprinkle of dusting sugar or a glaze. After some hesitation, I finally decided to top the cake with a chocolate and cointreau ganache to reinforce the chocolate and orange aroma.


Ok now let´s bundt!

The mold I used has the capacity of 10 cups and for it you need:
  • 3 large eggs at room temperature
  • 150 g soft butter
  • 160 g white sugar, 80 g brown sugar
  • 100 g chocolate, melted and cooled
  • 30 g cocoa powder
  • 200 g cake flour
  • 10 g baking powder
  • 1/2 tsp salt
  • 150 ml whole milk or cream
  • zest of 1 orange
  • 1 tsp and 1/2 of grated fresh ginger and 1/2 tsp ground ginger
  • 1 tsp cointreau (optional)
First sift together the flour, cocoa powder, baking powder and salt. Set aside.

In your mixing bowl, beat the sugar, butter, orange zest and ginger until creamy and well combined.

Add the eggs one by one, making sure they combine well before adding the next egg then add the cointreau. Add the chocolate, and mix again at a low speed.

Add the flour mixture in 3 batches, 1/3 then add half the milk, another 1/3 flour, the rest of milk and finish with the flour.

Pour the mixture in your greased pan and bake between 45 to 50 min in a preheated oven (175C) or until a skewer comes out clean, Leave in the pan for 10 min then unmold and  leave it to cool on a cooling rack.

For the ganache:
  • 150 g finely chopped chocolate
  • 125 ml cream
  • 25 g butter
  • 2 tsp cointreau (or vanilla extract)
Gently heat the cream and pour over the chopped chocolate, whisk until all the chocolate has melted. Add the butter and cointreau and whisk again and finally pour over the cake while it is still runny!

Enjoy

Friday, October 30, 2015

Autumnal Apple, Pumpkin and Walnut Cake


It has become a habit of mine to post a recipe or two around this time of the year featuring pumpkin purée as a main ingredient. Pumpkins are brilliant, versatile, delicious and very healthy. In baking pumpkins do wonders to the texture of cakes and of course add subtle, autumnal and  comforting flavors; flavors that keep you coming back for more.  Pair this ingredient with the smooth and wonderfully spiced apple butter, sprinkle in some walnuts and you're in for a superb autumnal cake that will surely please everyone!


The recipe is perfect for less a gory Halloween celebration or for a sweet finish to your next thanksgiving dinner but it's also perfect for any rainy day when all you want to do is just cuddle under your blanket, drink tea and enjoy a sweet piece of moist  and delicious cake with a soft and creamy frosting. Sounds perfect, right?

Let´s start baking then.

For the cake (6 to 8 persons) you need :
  • 3 eggs at room temperature
  • 210 g brown sugar
  • 150 browned butter (the French call it beurre noisette)
  • 9 g baking powder
  • 3 tbsp maple syrup
  • 210 g cake flour
  • 115 pumpkin purée
  • 115 apple butter
  • 100 g lightly toasted and roughly ground walnuts (leave some big chunks if you like)
  • 1 tsp cinnamon, 1 tsp mixed spices (cloves, star anise, ginger, cardamom, nutmeg)
  • dash of salt

Start by combining the flour, walnuts, baking powder, salt and spices and set aside.

In your mixing bowl beat the eggs on a high speed and add the sugar, when the mixture triples in volume and becomes pale and thicker add the browned butter at low speed and mix until combined.

With a spatula add the pumpkin purée, the apple butter and the maple syrup, mix again and lastly fold the flour mixture.

Pour the batter in three 15cm pre-prepared pans (or in two 23cm) and bake in a preheated oven (175C) for 25 minutes. Remember that the baking time might vary so check on the cake after 20 minutes.


For the frosting you need:
  • 250 g soft butter
  • 250 g cream cheese at room temperature
  • 220 g powdered sugar
  • flavoring: 1 tsp maple syrup, 1/4 tsp mixed spice or just use vanilla essence.
Combine all ingredients and beat for about 5 min until creamy and fluffy.

Assembly:
Smear some frosting on your cake tray or stand. Put the first cake layer and pipe a generous amount of frosting. Add the second layer and repeat with the second and third layer. Cover the last layer with the frosting. 

I decorated the cake with marzipan apples, pumpkins, acorns and leaves and colored the frosting to go along with the painted fruits and leaves.


Do take some time to make this cake and I´m sure you will like it.
Finally I wish everyone a Happy Halloween.
For more pumpkin recipes click here, here and here.