Showing posts with label cream cheese. Show all posts

Monday, September 7, 2020

Burnt Basque Cheesecake; A Cheesecake Like No Other


This year will definitely will go on record as one of the most difficult humanity has ever faced in recent memory. 

I have used blogging as a tool to explore and elevate my baking skills, interact with like-minded people from across the globe and quite frankly to have some fun. Having said that, I found it pretty difficult to blog this year for the reasons we all know and for personal ones too.  

However, it dawned on me these past weeks that baking has always managed to lift my spirits and helped me to get over whatever life decided to throw at me. So I baked and baked some more and boy have I got some recipes for you! 

I am quite happy to be sharing my first blog for the year with a recipe of a scrumptious cheesecake that will surely wash away all of the year's bitterness and stress with its creaminess and heavenly flavor. 


The recipe I´m sharing is not similar to other cheesecake recipes I have shared before. Here you can check some along with the last one that I shared in the past. These were great in their own right. 

This recipe was developed almost 30 years ago by Chef Santiago Rivera of La Viña restaurant in San Sebastian in the Basque region of Spain. 

After testing many cheesecake recipes, he created his own unique take on this ever so popular dessert. The result was an immediate hit and his version is considered by many to be one of the best in Spain and perhaps in the world. I´m sure you must have seen it all over the internet, and the best part is how easy it´s to make! Trust me, give it a try and you won´t be disappointed.  


I have adapted the recipe to my liking, I had to cut down the amount of sugar, used in the original one, and added the enticing flavors of vanilla and lemon zest, but you can add any other aroma you fancy.   

Ingredients:

  • 570g cream cheese at room temperature
  • 4 large eggs
  • 285 heavy cream (35%)
  • 150 g white sugar
  • 9 g corn starch or flour
  • a pinch of salt
  • seeds of  half a vanilla pod 
  • 1 teaspoon of lemon zest. 


First in a bowl, whisk the cheese, sugar, salt,  the eggs, the vanilla and the lemon zest. Then add the flour and whisk again and lastly add the cream and mix to combine. 

Wet a parchment paper, wrinkle it and cover an 18 cm springform pan with the wet paper. 

Pour the batter in the pan and bake in a preheated oven (200-210C) for 30 to 40 minutes. The cake will rise and the surface will take on a  glorious dark brown color. When you take the pan out, the center should remain a bit jiggly, but this is perfectly normal. Please avoid over baking it.

The dark brown top layer is not only visually pleasing, but it also adds sweet caramel notes to the cheesecake, making it extra delicious. 


Once it´s done, put it on a cooling rack, and let it cool completely before you put it in the fridge for at least 4 hours, or overnight for better results. 

Finally, all you have to do is to slice the cake and enjoy it as it is. It really doesn´t need any topping or syrup. Just enjoy the creamy, silky smooth and utterly delicious dessert, one spoonful after the other. 


Saturday, December 23, 2017

Rugelach, Delicate Festive Cookies.


December is undoubtedly one of the busiest months of the year. The holidays and their anticipation take a toll on us but they definitely bring unparalleled joy and warmth!

Though this year I did not have much time to think of an elaborate Christmas menu as my energy level is a bit down, I managed to determine one of the menu's sweet items.

I recently tried and really loved a sweet cookie called rugelach. I was not really sure how the cookies' name should be pronounced but I was certain that I found cookies that are worth featuring on my Christmas table or any other festive table.

These crescent shaped cookies were brought to America by the Asheknazi immigrants. The original recipe was leavened with yeast and sour cream was added for flavor and moisture. However, in the last century, the sour cream was dropped and replaced with cream cheese and the dough was no longer fermented.

The cream cheese adds an incredible softness to the dough and the butter makes it flaky and crumbly. The dough is usually stuffed with jam, chocolate and nuts all dusted with cinnamon. The filling can be customized to your liking; as longer as you like the ingredient, use it!

These cookies will captivate you with their aromatic, flaky and satisfyingly rich flavor.


Let´s make some rugelach.

 For the dough you need: (enough for 24 small pieces)
  • 170 g all purpose flour 
  • 160 g cold butter, cut into small cubes
  • 140 g cold cream cheese
  • pinch of salt
  • 20 g sugar
  • 1 tsp orange zest
  • 1/2 tsp cinnamon
  • dash of salt
In a big bowl, combine the flour, sugar, salt, zest, cinnamon and butter and mix with the paddle attachment until you get a sandy mixture. You can also use your pastry blender. Add the cream cheese and mix until well combined.

Divide the dough into 3 equal parts, wrap in plastic and refrigerate for at least 2 hours or overnight.


For the filling:
  • 150 g orange jam
  • 70 g chopped pecans or walnuts
  • 60 g sugar
  • about 50 g dark chocolate
  • 1 and half  tsp cinnamon.


Assembly:
On a generously floured surface, roll the dough (keep the other 2 parts in the fridge while you roll the first one) to about 20 to 22 cm disk of 2-3 mm thick.

Spread about 50 g of the jam, leaving 1 cm away from the edge. Cut the disk in 4 parts, then each part into 2 triangles. Sprinkle 20 g of the sugar, half tsp of the cinnamon, a generous sprinkle of pecans and the grated chocolate.

Roll each triangle into a crescent shape and tuck the edge on the bottom side to prevent the rugelach from opening while baking. Once you finish rolling you need to put the rugelach again in the fridge for at least a couple of hours.

Repeat the same process with the remaining dough.


Preheat the oven to 180 C.

Brush each cookie with milk, cream or egg wash. Sprinkle with coarse sugar and bake for 20 to 25 min or until golden brown.

As they bake, the cookies will fill your home with an irresistible Christmas aroma wafting from the cinnamon, the orange, the nuts, the chocolate and the dough itself. A heavenly mix!   I am sure you won't be able to wait for the cookies to cool completely before eating one or two.

With this recipe, I would like to wish everyone a very Merry Christmas. Keep on baking!

Friday, June 30, 2017

Blueberry, Lemon and Coconut Cake


Five years have passed by since I started blogging. This blog has certainly kept me busy and distracted from all of life's stresses and hard times. Whenever I need an escape to a more peaceful and calmer world, I run to my little kitchen and start mixing, kneading, shaping and decorating. Time flies when you are doing something you love and you just enjoy every single moment!

To celebrate the blog's fifth year anniversary and all the beautiful moments it helped me to live, I decided to make a simple, easy, yet delicious cake with vibrant, fresh and summery flavors.

I´m not revealing any secret when I say that I´m obsessed with berries, all kind of summer berries, and I just love to eat them fresh or use them in my baked recipes. Blueberries were my choice for this cake and I married their flavor with that of lemons and coconuts. Trust me when I tell you, the result was amazing! Give this cake a try and you won't be sorry!


Now for the sponge you need for five 15 cm in diameter pans:
  • 5 eggs (at room temperature)
  • 150 g sugar
  • 150 g cake flour
  • dash of salt
  • 60 g melted butter
  • Zest of 2 big lemons
  • 1 tsp of kirsh (optional)
  • 50 g shredded coconut

Combine sugar, eggs, lemon zest, kirsh and salt and start whisking at low speed and then start increasing until you get to the highest one; beat for at least 5 minutes. The mixture should triple in volume, become very pale in color and with a cloud-like texture.

Add the flour and the coconut. Mix gently with a spatula until everything is incorporated. Finally, add the butter and mix slowly.

Pour the batter in the greased and lined pans.
If you don´t have 5 pans of the same size, pour the batter into 2 pans and then once baked slice your cakes. Be careful that the baking time will vary as you change the size of the pans.

Bake the cake in a preheated oven (160 C) for about 18-20 minutes. Leave the cakes to cool for 5 minutes in the pan then unmold and transfer them to a cooling rack.


For the blueberry sauce:
  • 250 g fresh or frozen blueberries
  • 125 g sugar
  • 1 tbsp lemon juice
  • half vanilla pod
Combine everything and cook the berries for about 15 min, on a very gentle heat. If the sauce is too runny, just scoop out some of the liquid, but reserve to serve with the cake.


For the frosting:
  • 150 g soft butter
  • 50 g cream cheese or mascarpone
  • 100 to 150 powder sugar
  • 1 tsp lemon juice
Combine butter, cheese and sugar and beat until  fluffy and pale, add the lemon juice and beat for few seconds.


To assemble:

Place a bit of the frosting on the cake board and then place the first layer. Pipe some of the frosting on the cake and spread with a spatula to cover the whole layer then pipe a small circle round the edge.In the middle of the cake layer add a tbsp or 2 of the blueberry sauce and then top with another layer. Repeat until you have covered all the layers,

Add some frosting on the top and edges, smooth with a scraper then decorate as you wish. I covered the top with fresh plump blueberries and multi-colored pansies and added some petals and flowers on the sides too.

Do make this cake and enjoy its light and summery flavors.

From now and until the sixth year blog anniversary keep on baking!


Thursday, March 30, 2017

Bailey's Cheesecake, an Exceptional Cheesecake!


I often take inspiration from sights, sounds and certainly flavors that surrounded me while growing up. This post is also a trip into memory lane again like the last postDuring Christmas, as far as I can remember, tradition called for the offering of any visitor wishing us a Merry Christmas various sweet items such as chocolate, cake, dragée, and a small shot of liquor. Out of all the available options, my parents opted for Bailey's Irish Cream, and I can understand why! Though I could smell how delicious it was, I was not allowed to consume it of course. Once old enough, Bailey's was my first alcoholic experience, and it was love at first sip! Even till today, Bailey's remains one of my favorite drinks. 

In addition to drinking spirits and liquors, in moderation of course, I like to incorporate them into my cakes as they add another flavor dimension. Given how tasty Bailey's Irish Cream is, it is only appropriate that I use it in one of my recipes. The best candidate that I could think of was a cheesecake based recipe. I knew the combination would just work and I used the boozy cream in the three layers of the cake. I can't begin to describe how delicious it was, I just recommend that you try it and taste for yourself;  your taste buds will thank you for it! 


For the brownie base you need:
  • 75 g semisweet chocolate
  • 65 g unsalted butter
  • 50 g white sugar and 25 g dark brown sugar
  • 30 g flour
  • 1 egg
  • 5 g cocoa powder
  • dash of salt
  • 1/2 tsp vanilla
  • 1/2 tsp instant coffee
  • 1 tsp of Bailey's Irish Cream
Line an 18 cm pan with parchment paper and spray with nonstick spray. 

Sift the flour and the cocoa powder and add the salt.

In a double boiler and over a gentle flame, melt the chocolate and butter. Add the instant coffee to the melted chocolate and butter mix and combine well until it dissolves. Coffee enhances the flavor of chocolate, but don't add too much as its powerful taste can mask all other flavors!

When the chocolate mixture has cooled, add the sugar followed by the egg, Bailey's and the vanilla. Mix until everything is combined well. Now add the sifted dry ingredients, and mix well.

Pour the batter into the pan and bake for about 10 to 15 min in a preheated oven (180 C). 

Leave it to cool.


For the cheesecake mix:
  • 600 g cream cheese at room temperature
  • 3 large eggs at room temperature 
  • 120 g Greek yogurt ( you can use instead thick yogurt or sour cream)
  • 130 g sugar
  • 1 tbsp flour 
  • 4 to 5 tbsp of Bailey's Irish Cream
  • dash of salt
  • 1/2 tsp vanilla essence
  • 1/2 tsp of instant coffee

In your mixer bowl, add the cheese and mix on a low speed with the paddle attachment for 2 to 3 minutes. Then add the sugar,  yogurt, coffee and flour and mix again until well blended and no lumps are visible. 
Add the eggs one by one and keep mixing on a low speed. 

Finally add the salt, vanilla, Bailey's cream and mix for less than one minute. 

Pour the batter over the baked brownies and gently shake and tap to even the top. 

Bake in a preheated oven (150 to 160 C). 

Usually it's customary to wrap the spring-form pan with aluminum foil and place it in another pan filled with warm water and then bake for the required time that is usually for a pan of this size one hour to one hour and a half (oven-dependent).  This Bain-Marie method of cooking is needed to bake your cake at a gentler heat to avoid surface cracks.


What I do is different though. I put in the middle layer of the oven a pan and fill it with warm water then place the cheesecake pan over a cookie sheet and put both over the pan. This creates  a steamy environment in my oven and allows the cheesecake to cook all the way through while retaining a smooth creamy texture and most importantly with no surface cracks whatsoever.

After one hour, turn off your oven, shake the tray, make sure the middle is still a bit wiggly and leave the oven door cracked open for another half an hour to an hour. 

Let the cake cool completely before you put it in the fridge overnight. 


You can serve the cheesecake as it is, it´s amazingly delicious but a layer of a velvety chocolate ganache won´t do yo any harm, no? 
To make the ganache you need:
  • 100 g  dark chocolate
  • 100 g cream (35%)
  • 1 tbsp Bailey's cream
Chop the chocolate into small chunks, heat the cream to a gentle simmer, then add over the chocolate and mix until all the chunks have melted. Now all you need is to add the Bailey's, stir  and let the ganache cool down for few minutes before you pour over the cheesecake.


The cake will taste even better few days after it was baked. However, I'm sure it won't last much.  
Don't be too indulgent, invite a friend or two to share this special cheesecake with!

Enjoy! 

Thursday, December 22, 2016

Cranberry, White Chocolate and Rosemary Pound Cake with Cream Cheese Bourbon Frosting


When cranberries are in season, I can't help but buy as many as I can. What I don't use (or eat) immediately gets stacked in the freezer. I must confess that I sleep peacefully at night knowing that I have cranberries on standby in my kitchen!

Cranberries are quite popular in this festive season as they feature in many savory dishes and desserts. They definitely add an extra flavor that cannot be replaced by any other ingredient.

With that said, I wanted to try  a recipe that is very easy to make and is packed full of flavor. Now as you can tell from the title of the post, the ingredients used will certainly deliver a complex, fragrant, rich and tangy flavor. The frosting, with its creamy texture and Bourbon flavor adds another layer of complexity making this humble pound cake an absolute winner.


For the cake you need (23 x 10 cm pan)
  • 3 eggs at room temperature
  • 100 g soft butter
  • 50 g creme fraiche 
  • 100 g white sugar plus 50 g brown sugar
  • 150 g flour
  • 5 g baking powder
  • dash of salt
  • 1 tsp mixed spices (cloves, cinnamon, star anise, cardamom)
  • 80 g fresh cranberries (frozen is fine too)
  • 100 g chopped white chocolate
  • 1 tsp finely chopped rosemary
  • 1 tsp bourbon
For the frosting you need:
  • 100 g cream cheese at room temperature
  • 75 g powdered sugar
  • 1 tsp of bourbon (or 2 if you like a stronger flavor) 
  • 1 tbsp or 2 of milk

To make the cake, start by combining the flour, baking powder, mixed spices and salt.
In a bowl, whisk the butter and sugar until pale and creamy. Add the eggs one by one and whisk  to combine.  Add the flour mixture and mix well. 
Lastly combine the cranberries and the white chocolate.

Pour the mixture in a greased and floured pan and bake in a preheated oven for 35 to 40 min or until a skewer placed in the center of the cake comes out clean.

Once done, take out of the oven and let the cake cool down for 5 min in the pan and then remove and continue cooling it on a wire rack.


While the cake is cooling tackle the frosting.

With a whisk, cream the cheese for a minute or two. Add the sugar and whisk again. Mix in the milk then the bourbon. If the mixture is too thick, thin it down with milk, adding one teaspoon at a time until the desired consistency is reached.

Once the cake has cooled completely, pour the frosting over and let it drip on the sides. You can microwave the frosting for just a few seconds in order to become just a tiny bit runnier.

Decorate to your liking. I added a few sprigs of rosemary and sugared cranberries!
If you want to make sugared cranberries,  all you need to do is to whisk an egg white until frothy. Drop in the cranberries and coat them with the egg white. Remove them from the egg white and roll them into sugar. Leave them to dry for a couple of hours! The sugared cranberries look like frozen ones, a tribute to the winter season and the holiday spirit.

Make this cake during the holidays. It is the perfect accompaniment  with your afternoon tea or coffee or as part of your breakfast. Eaten alone or with family and friends, the cake is delicious, but as always sharing food with beloved ones just reinforces our ties with them. And what better time to do so then during the holidays?

Happy Holidays!


For other cranberry recipes click herehere and here

Wednesday, May 11, 2016

Brownie Cookies with Peanut Butter Filling


Last year's May could not have been any different from the current one. Last year, the weather was warm and towards the end of the month it become seriously hot. The thermometer jumped all the way up to 35 C. As for this year, it´s been raining like crazy. It didn't rain like that even at the height of winter. Though it may sound weird, but I actually enjoy such rainy and cold weather. It invites me to indulge in all sorts of comfort food and especially to bake luscious treats!
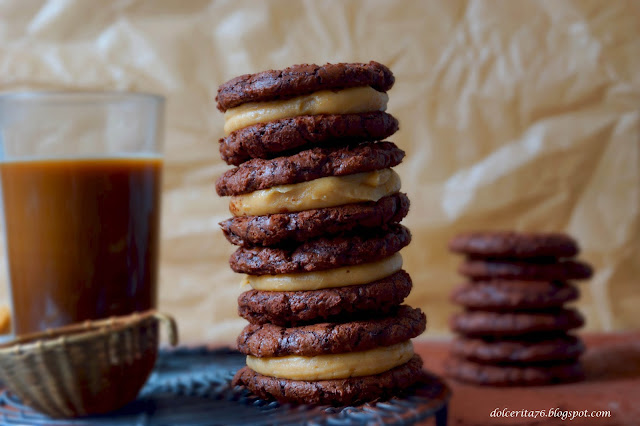
The recipe I´m sharing today is one I have been wanting to share for a long time now, but somehow I kept postponing it. With this rainy weather, I think it's the right time to do so. After all, what's better than a chocolaty treat on a rainy day?!


This brownie cookie recipe is inspired by one of Donna Hay's cookie recipes. She filled her brownie cookies with peanut butter and  I really liked the idea. However, I tweaked her recipe using my own version of brownies and filling.

The recipe is really easy and needs few ingredients. So let´s start baking!
For 14 to 15 small cookies you need:
  • 1 egg at room temperature
  • 100 g sugar
  • 1/2 tsp vanilla extract or coffee liqueur 
  • 110 dark chocolate (I used 74%)
  • 20 g butter
  • 1/2 tsp coffee powder
  • 20 g flour
  • 5 g cocoa powder
  • dash of salt
  • 1/8 tsp baking powder (about 1g)
First combine the chocolate and butter and melt in a microwave, or over a double boiler. If melting in a microwave, put them for 30 sec, then stir. Put for an additional 20 sec if not molten. Repeat until all of the chocolate and butter have melted. Finally add the coffee powder.

Combine all the dry ingredients but the sugar in a bowl and set aside.

In a bowl, whisk the egg, sugar and vanilla, until you get a creamy and pale mixture. On a low speed, add the chocolate mixture gradually. When well combined, fold in the flour mixture.


Place the brownie mix in the fridge for 20 min.

On a pan covered with parchment paper, scoop about one tbsp of the mixture (I used a small ice cream scoop) and drop on the pan. With a little pressure, lightly flatten the brownie ball a bit. Make sure to leave enough space between each one, as the cookies witll xpand during baking. Bake in a preheated oven (180 C) for about 8 to 10 min.

Remove the cookies from oven and let them cool for at least 10 min before taking them off the pan.


For the filling you need:
  • 75 g peanut butter
  • 25 g cream cheese (room temperature)
  • 50 g soft butter
  • 50 g powdered sugar
  • 1/2 tsp vanilla extract (optional)
Combine all the ingredients and beat until creamy and fluffy.

Now all you need is to fill the cookies and enjoy with coffee, milk or tea!

These cookies are slightly crunchy on the outside and with a soft and fudgy heart, all chocolate lovers will drool over them; I surely did!

Thursday, April 21, 2016

Raspberry Cream Cheese Streusel Coffee Cake


Our lives are quite often punctuated by daily activities or rituals that we just wouldn't function without. Mine are breakfast and afternoon coffee! I always need to have something with my comfort cup of coffee and it has to be something sweet of course!

This post's cake is called coffee cake but truth be told has no coffee in it, but it's called a coffee cake because it makes such a perfect companion to coffee. In fact it tastes better when eaten while drinking coffee than if you have it alone.

I have made this cake before but with different fruits, this time I opted for raspberry and a touch of lemon for fresh and floral flavors.


There's nothing overaly complicated with this recipe but it does require some planning and if possible a bit of preparation ahead. The result is really worth all the effort you put into it.  You will get a cake with four layers all harmoniously combined. The first layer is the rich and soft base, the second is the creamy and sweet cheese layer, topped  by the third layer of tangy raspberries and finished by the last crumbly cinnamon and crunchy almonds layer! 


Let´s start caking. I used an 18 cm springform pan for this one. 

For the Streusel layer :
  • 20 g cold butter, cut into small cubes
  • 20 g sugar 
  • 40 g flour
  • 1/2 tsp cinnamon
  • dash of salt
Combine all ingredients in a bowl and with the tip of your fingers bring everything together until you get a sandy mixture! I made this layer the night before, and left it in the fridge.


Cake layer:
  • 1 egg at room temperature
  • 80 g sugar
  • 60 g soft butter
  • 60 g sour cream or yogurt
  • zest of half of a lemon
  • 1/2 tsp vanilla extract
  • 125 g cake flour
  • 1/2 tsp baking powder plus 1/4 baking soda
  • dash of salt
Combine flour, baking powder, baking soda and salt and set aside. 

Cream butter and sugar, add the sour cream, mix until well combined, add the egg, lemon zest and vanilla and mix again. Add the flour mixture, mix for a few seconds until combined. Spread the batter on the prepared pan, making sure that the edges are about one cm higher, making room for the cheese layer. 

Cheese layer:
  • 125 g cream cheese at room temperature
  • 40 g sugar
  • zest of half a lemon
  • 1 small egg (about 50 to 55 g)
  • 100 to 125 g of fresh raspberries and almonds, preferably slivered (optional)
Mix the cheese with the sugar and lemon zest, once combined add the egg and mix again until you have a homogeneous mixture.


Now pour the mixture over the cake layer, arrange the raspberries until they cover the cheese layer. 
Sprinkle the streusel all over the top and finish with the almonds if using!

Bake in a preheated over (160C) for about 40 min. It will be ready when the edges are golden brown, the middle is slightly soft and the streusel is golden in color!

Leave it to cool in the pan for 10 to 15 min, then remove and let it cool completely. You can sprinkle some dusting sugar or have it as it is with some fresh raspberries and some coffee of course!

Saturday, February 13, 2016

A Valentine's Chocolate and Blackberry Cake


Flowers, especially roses, gifts, cards, love declarations and of course romantic meals are the norm of Valentine celebrations around the world. Personally I don´t think we need any fixed date to celebrate love, but it´s a longstanding tradition  and it wouldn't hurt if for one day if we did something extra for the ones we love.

I once read that "cooking is love made visible" and I couldn't agree more. For me, cooking is a labor of love first and foremost and when you don't cook with love and passion the end result will always be lackluster. This Valentine day bake  a cake or cook a nice meal for your significant other or for just anyone you think is deserving of your love. If cake is on the menu then I've got just the perfect recipe for you!


I first made this cake was for my birthday celebration, but once decorated it was clear that it is the perfect cake for Valentine. It's layered cake with chocolate and blackberries that not only tastes great but also shines with its simple elegance; you can never go wrong with that. Taste wise it has a delicate balance between the depth of chocolate and the freshness and tang the fruits add.

Let's start baking.

For the sponge you need: 
  • 3 eggs at room temperature
  • 180 g granulated sugar 
  • 150 g melted  butter 
  • 180 g sifted flour
  • 30 g cocoa powder
  • 125 g blackberry purée (recipe follows)
  • 50 ml of milk or cream
  • 8 g baking powder
  • 90 g melted and cooled chocolate
  • 1 tsp blackberry liqueur; optional (you can rum or any other fruit liqueur) 
  • dash of salt
  • 1 tsp of vanilla extract


For the frosting you need:
  • 250 g butter  (room temperature)
  • 150 g cream cheese (room temperature)
  • 200 g powdered sugar
  • 2 tbsp blackberry purée
For the blackberry purée you need:
  • 300 g blackberries
  • 20 g sugar
  • Seeds of a half vanilla pod or 1 tsp vanilla extract
For the purée
Combine all ingredients and gently simmer for about 10 to 15 min or until the fruits are soft, pass the purée into a sieve to get rid of the seeds, and you´re done.

For the sponge:
First combine all the dry ingredient, mix well, set aside. Beat the eggs with the vanilla and the liqueur (if using), slowly start adding the sugar. Keep beating until the egg mixture doubles in volume and becomes rather thick.

Add the chocolate and mix at low speed. Turn off the mixer, add the butter and mix slowly till well combined, fold in the flour, then the blackberry purée, the milk or cream and mix again until well combined.

Pour the batter into 4 greased and lined pans (15 cm) and bake for 20-25 min at 180 C preheated oven. If you don´t have 4 pans do as I did since I only have 2. Divide the batter in two equal amounts, bake the first batch while the other half rests in the fridge, then bake the second batch. 


Once out of the oven, let the cakes cool for 5 min in the pan then transfer to a cooling rack until they are completely cooled. 


For the frosting:

Start mixing the butter and cheese, add the sugar and then the purée. Mix until well combined. Leave in the fridge for at least half an hour before you frost your cake!

Assembling:

Brush each layer with some blackberry purée, then add a generous amount of frosting between each layer, lightly frost the outside of the cake and decorate with a real rose using the color that your like! 

Happy Valentine!